If your car suddenly loses power to the radio, windows, headlights, or even refuses to start, there’s a good chance the problem starts at one place: the auto electrical fuse box.
Most drivers know it exists… but not what it does, where it is, or how to fix it when something goes wrong.
In this guide, you’ll quickly learn:
How to find your car fuse box location (under-dash vs engine bay power distribution box)
How to read a fuse box diagram so you’re not guessing in the dark
The real causes of blown fuse symptoms and melted fuse box terminals
When a simple fuse swap is enough—and when you actually need a full battery junction block or fuse box replacement
We’ll walk you through diagnosing, testing, and even replacing an auto electrical fuse box step by step, using real-world examples from modern vehicles (including cars with smart junction boxes and TIPM units).
If you want to stop chasing random electrical gremlins and finally fix the issue the right way, keep reading.
Where Is the Auto Electrical Fuse Box Located?
If you’re chasing an electrical issue, the first question is simple: where is the auto electrical fuse box located? The good news – every car has at least one, and it’s almost always in a predictable spot.
Main Fuse Box Locations (Under Dash, Engine Bay, Trunk)
On most vehicles, the car fuse box location will be in one or more of these places:
Under dash fuse box / cabin fuse panel
Under the driver’s side dash (above your left knee)
Behind a small panel near the steering column
On the side of the dash (only visible when the door is open)
Engine bay fuse box / power distribution box
In the engine compartment
Usually near the battery, fender, or firewall
Covered by a black plastic lid with fuse and relay symbols
Trunk or rear fuse box
Behind a trim panel in the trunk or cargo area
Near the battery (on some European cars and SUVs)
Under the trunk floor next to the spare tire
Most modern cars have at least two fuse boxes: one inside (cabin) and one outside (engine bay).
How to Quickly Find Your Car’s Fuse Box Without a Manual
If you don’t have a manual handy, use this quick process:
Check under the dash
Slide your head under the steering wheel.
Look for a plastic cover or small panel with a pull tab.
Some have a little fuse icon stamped into the plastic.
Check the side of the dashboard
Open the driver’s door.
Look at the side of the dash facing the door.
Many cars hide a cabin fuse panel behind a snap-off side cover.
Check the engine bay
Pop the hood.
Look near the battery, driver’s side fender, or firewall.
The engine bay fuse box is usually a black box with a removable lid.
Check the trunk or cargo area
Lift the trunk floor panel near the spare tire.
Or look behind a removable side panel in the cargo trim.
If it looks like a black plastic box with a removable lid, and there are thick wires running to it, you’re probably staring at a fuse box or power distribution box.
Typical Fuse Box Locations by Brand
Here’s where I usually find them on popular brands (your exact car may vary by year and trim):
Toyota (Camry, Corolla, RAV4, etc.)
Cabin: Under dash on the driver’s side or lower left side of dash.
Engine bay: Near the battery or driver’s side fender.
Honda (Civic, Accord, CR‑V, etc.)
Cabin: Under dash, above the driver’s left leg, sometimes behind a small cover.
Engine bay: Near the battery or firewall.
Ford (F‑150, Explorer, Focus, etc.)
Cabin: Under dash or kick panel on the driver’s side.
Engine bay: Large power distribution box near the battery.
Some trucks/SUVs: Additional junction blocks under the rear seat or cargo area.
Chevy / GM (Silverado, Malibu, Tahoe, etc.)
Cabin: End of the dash (door must be open) or under dash.
Engine bay: Fuse/relay center near the battery.
Some models: Extra fuse panels under rear seats or trunk.
VW / Audi
Cabin: Side of dash behind a panel, or under the driver’s side dash.
Engine bay: Near the battery or at the cowl area.
Some models: Rear fuse box in trunk, near the battery or behind trim.
If you’re still lost, a quick search like “fuse box location + your year/make/model” usually pulls up an image or diagram.
How Many Fuse Boxes Can a Modern Car Have?
Modern vehicles often have 2–4 fuse boxes, and that’s on purpose:
Cabin fuse panel (interior fuse box) Handles interior and comfort circuits: windows, radio, interior lights, etc.
Engine bay fuse box / power distribution box Handles high‑amperage and critical circuits: starter, cooling fans, ABS, ECM/PCM, and more.
Rear/trunk fuse box (on some models) Handles rear electronics: fuel pump, power liftgate, rear HVAC, trailer wiring.
Smart junction box or TIPM (on newer vehicles) A combined fuse/relay/module unit that manages multiple body electrical functions.
All of this is done to shorten wiring runs, protect more circuits, and split high‑power systems from low‑power, interior electronics.
Signs You’re Looking at the Fuse Box (Not Just Any Black Box)
When you think you’ve found something that might be an auto electrical fuse box, look for:
A removable plastic cover
Usually snaps or clips off.
May say “FUSES”, “RELAY”, “FUSE/RELAY CENTER”, or “POWER DISTRIBUTION”.
Fuse box cover legend
Underside of the lid often shows a diagram with:
Fuse positions
Amp ratings (10A, 15A, 30A, etc.)
Labels like IGN, ECM, ABS, RDO, PWR OUTLET
Blade fuses and mini fuses
Rows of colored plastic pieces (red, blue, yellow, green).
These are your automotive fuse panel circuits.
Relays
Small rectangular or square blocks plugged into the same box.
Often gray, black, or brown – these switch higher-current circuits.
Thick wiring harnesses
Large multi-pin connectors clipped to the underside or side of the box.
Heavy gauge cables running to the battery or main grounds.
If you see a plastic box with a labeled cover, colored fuses, and multiple wiring harnesses plugged in, you’ve found the auto electrical fuse box you’re after.
Interior vs engine bay auto electrical fuse box
In most modern cars, you’ll have at least two main fuse panels: a cabin (interior) fuse box and an engine bay fuse box or power distribution box. Knowing which one does what saves you a lot of time when something stops working.
What the interior fuse box controls
The interior fuse box (also called the under dash fuse box or cabin fuse panel) usually handles comfort and convenience circuits, such as:
Power windows, mirrors, and door locks
Interior lights and ambient lighting
Radio / infotainment, speakers, and USB ports
Cigarette lighter / 12V sockets
HVAC controls (fan speed, blend doors, control panel)
Seat heaters, power seats, steering wheel heater
Sunroof, trunk release, wipers and washers in some models
If your car starts and drives, but “inside stuff” is dead (no radio, no interior lights, one window won’t move), you’re almost always dealing with a cabin fuse first.
What the engine bay fuse box controls
The engine bay fuse box is the main high-amperage and critical systems hub. It typically protects:
Engine control (ECM/PCM power, ignition feeds)
Fuel pump, injectors, and key engine sensors
Cooling fan, radiator fan relays
ABS pump and sometimes stability control
Starter relay and main power relays
Headlights, sometimes fog lamps and horn
Charging system circuits (alternator feeds)
When the car won’t start, stalls, or key systems like cooling fans or ABS stop working, the engine bay fuse box is usually where you look first.
Why some vehicles use multiple fuse boxes and power distribution centers
Many newer vehicles use several auto electrical fuse boxes and power distribution centers to:
Shorten wiring runs and reduce voltage drop
Separate high-current engine loads from sensitive interior electronics
Improve safety by isolating faults to specific areas
Make it easier to add options and trim-level equipment
On some models, that engine bay box is actually a “smart” power distribution center or TIPM (Totally Integrated Power Module), combining fuses, relays, and electronics in one unit. For a deeper dive into how a modern auto electrical fuse box is built and protected, I recommend checking a focused guide like this auto electrical fuse box overview: https://cnsovio.com/auto-electrical-fuse-box/
How interior vs engine bay fuse boxes fail differently
Because they live in different environments, they tend to fail in different ways:
Interior fuse box typical issues:
Worn or loose terminals from repeated fuse changes
Coffee/soda spills seeping through dash or console
Heat damage around high-draw interior circuits (seats, blowers)
Engine bay fuse box typical issues:
Heat soak from the engine causing brittle plastic and cracked housings
Water ingress from a
How to read an auto electrical fuse box diagram
If you can read your auto electrical fuse box diagram properly, you’ll solve 80% of basic car electrical problems yourself. Here’s how I break it down so anyone can follow it.
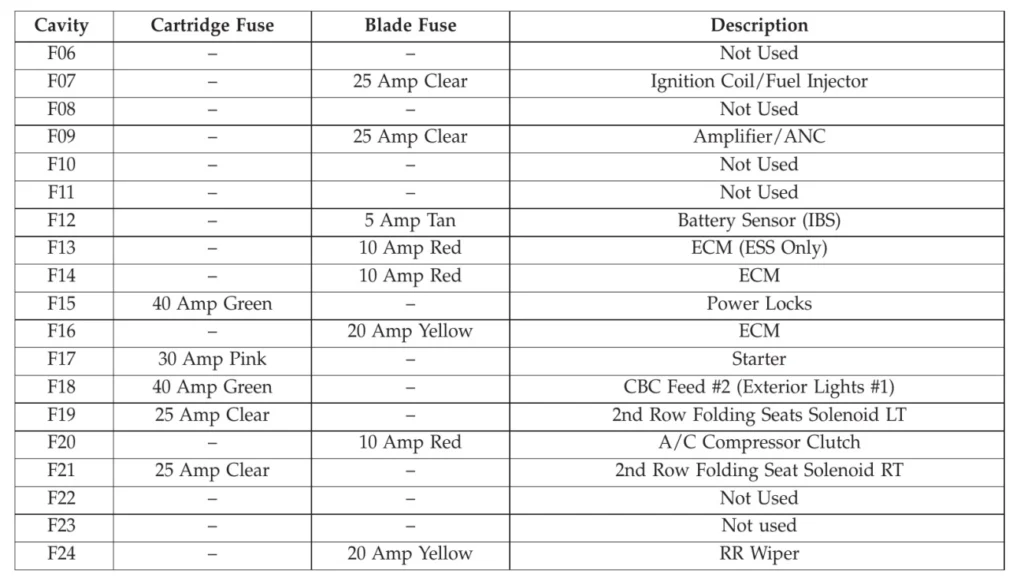
Fuse box cover legends and common abbreviations
Start with the legend printed on the fuse box cover or in the owner’s manual. It’s basically a map:
Each fuse cavity is numbered or grid-marked (e.g. F1, F12, 15, 27).
Next to it, you’ll see a label + amps + sometimes a symbol.
Common abbreviations you’ll see:
BCM – Body Control Module (locks, windows, interior lights, etc.)
RDO / RADIO / AUDIO – Radio / infotainment
IGN / IGN1 / IGN2 – Ignition circuit
ECM / PCM – Engine/Powertrain Control Module
ABS – Anti-lock Brake System
A/C – Air conditioning
F/P – Fuel pump
P/WR / PWR WNDW – Power windows
BLW / HTD – Blower motor / heated systems
If the legend is worn or missing, take a clear photo and compare with an online diagram by year, make, and model.
Fuse amperage ratings and color codes
Blade fuses are color-coded worldwide. You don’t need to memorize everything, but these are the ones you’ll see most:
Fuse rating
Color (standard blade/mini)
5A
Tan / light brown
7.5A
Brown
10A
Red
15A
Blue
20A
Yellow
25A
Clear or white
30A
Green
40A+
Larger/Maxi fuses (varies)
Key rule: Always replace with the same amp rating. Never “upgrade” to a bigger fuse to stop it blowing. That’s how wiring burns and, in heavy systems (similar to how high-voltage power components are protected), you’re protecting the wire, not just the device.
Matching diagram positions to physical fuses and relays
To match what you see on the legend to the actual hardware:
Find the orientation arrow Most covers have “FRONT” or a small car outline. Hold the cover in the same direction as the fuse box.
Use the grid Diagrams often show rows and columns:
Row A, B, C…
Column 1, 2, 3… So “A5” on the diagram is row A, position 5 on the panel.
Match shapes, not just numbers
Small rectangles = mini blade fuses
Larger blocks = standard/Maxi fuses
Squares or tall rectangles = relays
Cross-check with labels Once you find the right cavity, verify against the legend:
Example: F23 – “RADIO 15A” Pull that specific 15A fuse, not the one next to it.
Take a quick photo of the fuse box before you start pulling anything. It’s your cheap insurance if you lose track of positions.
Using your owner’s manual to decode fuse locations
If the cover is missing, faded, or in another language, go straight to the owner’s manual:
Look for sections like:
“Fuses”
“Fuse Box”
“Power Distribution”
You’ll usually see:
A picture of the interior fuse box (under dash / side panel).
A picture of the engine bay fuse box.
Tables that list:
Fuse number
Amp rating
Circuit (e.g. “CIG & PWR OUTLET”)
Location (cabin / engine bay)
Use the manual and the physical layout together:
Match the diagram shape to your box.
Confirm fuse numbers from the table.
Note any shared circuits, like “RADIO / ACC / CIG” on one fuse.
Printable and online fuse box diagrams by year, make, and model
If you don’t have the manual, you can still get accurate diagrams:
OEM sources
Official brand websites (owner section)
Online PDF owner’s manuals
Trusted databases
Repair info sites (Alldata, Mitchell, some free DIY platforms)
Year + make + model + “fuse box diagram” Example: “2016 Ford F-150 interior fuse box diagram”
Once you find a diagram:
Print it or save it on your phone.
Compare the image to your physical fuse box.
Mark the fuses that matter most to you:
Radio / infotainment
Cigarette lighter / 12V socket
ECM / ignition
Fuel pump
Cooling fan
ABS / airbag
Do this once, and next time an accessory dies, you’ll know exactly which fuse to check in seconds.
Common auto electrical fuse box problems and symptoms
When an auto electrical fuse box starts failing, the car usually tells you early—if you know what to look for. Catching these signs fast can save you from bigger damage and higher repair bills.
Top symptoms of a bad fuse or fuse box
Watch for these common issues:
No-start condition
Engine doesn’t crank or only clicks
Dash lights may be dim or dead
Often linked to blown fuses for ignition, starter, ECM/PCM, or main power
Dead accessories
Radio, interior lights, power windows, sunroof, or 12V ports stop working
Usually tied to a single blown fuse or a bad terminal in the cabin fuse panel
Warning lights on the dashboard
ABS, airbag, traction control, or check engine lights popping up together
Can point to poor power or ground at the fuse box or corroded connections
Repeatedly blown fuses
If the same fuse keeps blowing, it’s not “just a bad fuse”:
Likely causes:
Shorted wiring (rubbing on metal, pinched in doors/panels)
Failing component (motor, module, or relay drawing too much current)
Overloaded circuit from aftermarket add-ons tied into the wrong fuse
What it really means: You have an underlying fault. Replacing the fuse over and over is only a band-aid and can eventually damage the fuse box itself.
Burnt or melted fuse box terminals
This is serious and needs attention fast:
What you’ll see:
Discolored or melted plastic around specific fuses or relays
Brown/black burn marks on fuse blades or terminals
Loose or distorted fuse slots that no longer grip properly
What it causes:
Intermittent power loss to that circuit
Overheating and risk of further melting or even fire
In many cases, the fuse box or battery junction block needs replacement, not just cleaning
High‑voltage systems in heavy equipment face similar risks, which is why advanced protection like a quality vacuum circuit breaker is used to handle high current safely—your car’s fuse box plays a similar protective role at a smaller scale.
Water ingress, corrosion, and cracked housings
Moisture is one of the biggest enemies of any automotive fuse panel:
Common causes:
Leaking windshields or door seals
Clogged sunroof drains
Engine bay wash, deep puddles, or flood exposure
Cracked or damaged fuse box cover
What you’ll notice:
Green/white corrosion on terminals and fuse blades
Rusty or swollen connectors at the back of the fuse box
Random electrical glitches: windows working sometimes, then not; lights flickering
Musty smell or visible water stains near the under dash fuse box
Water damage that reaches internal bus bars can’t be trusted long term—replacement is usually the only safe fix.
Intermittent electrical issues
These “sometimes it works, sometimes it doesn’t” problems often trace back to the fuse box:
Power windows, locks, or seats cutting in and out
Headlights or cooling fans that randomly stop, then start again
Accessories that work when you tap the dash or fuse box area
Car stalls over bumps or when you hit a pothole
This usually points to:
Loose fuse or relay sockets
Cracked solder joints inside smart junction boxes
Heat‑stressed and fatigued terminals
Total power loss after rain or a car wash
If your car suddenly loses power right after heavy rain or a wash, think fuse box:
Typical signs:
No power to dash, interior lights, or accessories
Car may not crank at all
Problem appears after water exposure and may disappear once everything dries
Likely causes:
Engine bay fuse box or power distribution box took in water
Poor sealing or a cracked housing letting moisture in
Corrosion or shorting across main power feeds
In these cases, don’t ignore it. Each repeat event increases the risk of permanent damage and possible failure while driving.
If you manage fleets, run off‑road builds, or work in harsh environments, it’s worth planning stronger protection and distribution systems up front—similar to how industrial setups rely on robust gas-insulated circuit breakers for reliability under tough conditions.
How to test fuses in an auto electrical fuse box
If you’ve got an electrical issue, testing the fuses in your auto electrical fuse box is one of the fastest, cheapest checks you can do yourself. Here’s how I handle it step by step.
Safe visual inspection of blade and mini fuses
Start simple before you grab any tools.
Turn the ignition off and remove the key.
Open the cabin fuse panel or engine bay fuse box cover.
Pull fuses with a fuse puller or needle‑nose pliers (don’t yank on the plastic housing around them).
Look through the little window on blade or mini fuses:
Good fuse: metal strip inside is intact.
Blown fuse: metal strip is broken or there’s black/brown burn marks.
Always match amperage ratings and fuse amperage color codes when replacing (e.g., 10A = red, 15A = blue, 20A = yellow). Never “size up” a fuse just because it keeps blowing.
If a fuse looks okay but the circuit is still dead, move on to actual testing.
Using the swap method with fuses and relays
The swap method is quick and works well when you don’t have tools handy.
Find a fuse with the same amp rating that controls a non-critical system (for example, swap with a seat heater or power outlet you don’t need right now).
Swap the two fuses:
If the original dead circuit starts working and the other one stops, the old fuse was bad.
You can do the same thing with relays:
Many fuse boxes use identical relays (for fans, horn, starter, etc.).
Swap two identical relays (same part number) and see if the problem follows the relay.
If swapping fixes it, replace the bad fuse or relay with the correct part and move on.
Testing fuses with a cheap test light
A basic 12V test light is often enough to diagnose a car fuse.
Turn ignition to ON (or to the position where the circuit should have power).
Clip the test light to a good ground (bare metal, engine block, or a ground stud near the power distribution box).
Touch the test light probe to the two small metal tabs on top of each fuse:
Good fuse: both tabs light up.
Blown fuse: only one side lights up (power side), or neither lights up if there’s no power to that circuit.
If no fuses light up and you know the system should be powered, you may be dealing with a main feed, battery junction block, or even upstream switchgear issue. In commercial and industrial setups, this is where higher-level protection such as low-voltage and medium-voltage switchgear comes into play to manage and isolate faults safely.
This test is fast and doesn’t require pulling each fuse.
Basic multimeter tests (continuity and voltage drop)
If you have a multimeter, you can be more precise.
Continuity test (fuse removed):
Set the meter to ohms or continuity.
Touch one probe to each blade of the removed fuse.
Good fuse: very low resistance / beeps.
Blown fuse: infinite resistance / no beep.
Voltage test (fuse in place):
Set the meter to DC volts.
Black probe to a good ground, red probe to each test tab on the fuse:
Both sides show battery voltage → fuse is good and powered.
One side shows battery voltage, the other shows 0 V → fuse is blown.
Both sides show 0 V → no power reaching the fuse (possible fuse box, wiring, or relay issue).
Voltage drop across fuse:
Probes on each side of the fuse.
For a healthy fuse under load, voltage drop should be close to 0 V.
A noticeable voltage drop can mean high resistance inside the fuse or bad contact at the fuse terminals.
OBD2 codes that point toward fuse box issues
Your OBD2 scanner can give clues when the auto electrical fuse box or its circuits are acting up:
“Control module no communication” codes (U‑codes, like U0100, U0140) can be caused by blown fuses to ECM/PCM, ABS, BCM, or TCM.
Sensor circuit low/no voltage codes (P0XXX with “circuit low”) may indicate blown fuses or poor power feed in the engine bay fuse box.
Multiple systems down at once (e.g., ABS, traction control, power steering, and transmission lights all on) often point to:
A shared fuse or relay.
A failing smart junction box, TIPM (Totally Integrated Power Module), or corroded fuse box connections.
If you see repeated codes for modules losing power or communication, and fuses keep testing good, the problem can be inside the fuse box itself (loose bus bar, melted terminal, or internal corrosion).
By combining a quick visual check, the swap method, a test light, and a basic multimeter, you can accurately test fuses in your auto electrical fuse box and know whether you’re dealing with a simple blown fuse or a deeper power distribution problem.
When to replace the entire auto electrical fuse box
Sometimes the problem isn’t a single blown fuse – it’s the whole auto electrical fuse box (or power distribution box) starting to fail. Knowing when to replace it saves you from random electrical headaches and safety risks.
Bad fuse vs failing fuse box
Bad fuse (simple, cheap fix):
Only one or two functions stop working (e.g., radio, lighter, one window)
Fuse looks:
Metal strip broken
Slight dark spot inside
Fuse slot is clean and tight
Replacing the fuse with the correct rating fixes the issue, and it doesn’t blow again
Failing fuse box (bigger, system-level issue):
Multiple unrelated circuits act up (lights, wipers, blower, windows, etc.)
Fuses are OK, but power keeps cutting in and out
Wiggle the fuse/relay → things work briefly, then fail again
Signs of heat, melting, or corrosion around the fuse/relay slots
Car throws random electrical faults or won’t start despite good battery and fuses
Damage that can’t be safely repaired
If you see any of this, the fuse box usually needs full replacement, not a “patch”:
Damage Type
Why It’s Serious
Action
Melted plastic around fuses
Overheating, poor contact, risk of fire
Replace fuse box
Burnt/browned bus bars
Internal high resistance, unstable voltage
Replace fuse box
Loose or burned terminals
Causes arcing, intermittent power
Replace fuse box
Heavy green/white corrosion
High resistance, unreliable connections
Replace fuse box
Cracked housing or cover
Lets in water and dirt, repeated failures
Replace fuse box
Once the metal bus bars or terminals are damaged, “cleaning and bending” is a band-aid. It won’t be reliable long term.
Smart junction box & TIPM failures
Modern cars and trucks often use an integrated box instead of a simple fuse panel:
Smart Junction Box (SJB) – common in many modern sedans and SUVs
TIPM (Totally Integrated Power Module) – common on many Chrysler, Dodge, Jeep, and RAM models
Typical symptoms:
Random no-start, but then starts fine later
Fuel pump, cooling fan, or lights stuck ON or never turning on
Wipers, horn, door locks, or windows acting on their own
Multiple “false” warning lights and codes, different each time
Because these units combine fuses, relays, and control electronics, internal failures usually mean replacement, not repair. If you’re building or upgrading power distribution in industrial or fleet applications, you’ll see similar logic in low-voltage switchgear and ring main units, like our own power distribution and protection solutions designed for reliability under heavy loads.
When water damage makes replacement mandatory
Moisture is a fuse box killer. Replace the auto electrical fuse box if you see:
Standing water inside the fuse box
White/green crust on many terminals
Rust on internal metal parts
Mud/silt inside (after flood / off-road / deep water)
If the car had flood damage or the fuse box got soaked in the engine bay or cabin, assume internal corrosion will keep spreading. Cleaning lightly corroded terminals is fine; cleaning a flooded fuse box is not a safe long-term fix.
How long can you drive with a suspect fuse box?
If you suspect the fuse box is failing, every extra day you drive is a trade-off:
Short term (a few days):
You might get away with it if the problem is minor (like one flaky accessory)
Still, don’t ignore burning smells, melted plastic, or visible arcing
Medium to long term:
Higher risk of:
Sudden no-start
Headlights or wipers failing while driving
Overheating and possible fire in extreme cases
General rule:
If you see heat damage, melting, or smell burning → stop driving and address it immediately.
If it’s only minor corrosion and no safety systems are impacted, you can drive short distances while you plan a repair – but don’t drag it out.
Repair vs replace: cost comparison
Costs vary by car type and whether you go OEM or aftermarket, but here’s a rough guide:
Option
Typical Cost (USD)
Notes
Replace a few fuses/relays
$5 – $40
DIY, very low cost
Clean light corrosion, tighten terminals
$0 – $100
DIY or basic shop labor
OEM basic fuse box (older/simple cars)
$120 – $350 (part only)
More on imports and luxury models
OEM smart junction box / TIPM
$300 – $900 (part only)
Programming may be required
Aftermarket / reman TIPM or SJB
$250 – $700
Look for warranty & reputable supplier
Shop labor for fuse box replacement
+$150 – $600
Depends on access & programming time
My take:
If the box is melted, burnt, or flooded → don’t waste money trying to repair it. Replace it.
For light corrosion or a single loose terminal, a good shop can often repair/clean it and save you money.
On newer vehicles, always consider the total installed cost, including programming, not just the part price.
If you work with larger electrical systems as well, the same “repair vs replace” logic applies to industrial switchgear and isolators — once internal damage is significant, a full replacement (similar to upgrading to a new switch isolator or low-voltage switchgear setup) is usually the safer, more reliable move.
When in doubt, treat the auto electrical fuse box as a safety-critical part. If it’s burned, melted, or water-damaged, replacing it isn’t an upgrade – it’s necessary protection for your car and everyone riding in it.
Choosing the right replacement auto electrical fuse box
When you replace an auto electrical fuse box, you can’t guess. The wrong panel can cause new faults, warning lights, or even damage. Here’s how I pick the right car fuse box for global customers who drive everything from small city cars to full-size trucks.
OEM vs aftermarket fuse box options
You’ve got two main choices:
OEM (Original Equipment Manufacturer):
Built to the same spec as your factory fuse box.
Best if you want plug-and-play reliability with no surprises.
Usually more expensive, but you get correct fit, correct fuse box layout, and stable quality.
Ideal for complex cars with smart junction boxes, TIPM (Totally Integrated Power Module), BCM, and CAN-bus systems.
Aftermarket auto electrical fuse box:
Cheaper and easier to find for older cars or popular models.
Quality can range from excellent to terrible.
Good for simple power distribution boxes or when the original part is discontinued.
For modern cars with smart electronics, I only trust high-quality brands or OE-equivalent suppliers.
If the vehicle uses a smart junction box or integrated power module (common in newer Ford, Chrysler, Jeep, RAM, VW, BMW, etc.), I lean strongly toward OEM or a proven OE supplier.
Direct-fit plug-and-play vs universal fuse panels
Not all automotive fuse panels are the same:
Direct-fit plug-and-play fuse boxes:
Designed for your exact car (same connectors, mounts, and fuse box layout).
No cutting or splicing into the wiring harness.
Best choice for daily drivers and modern vehicles.
Saves time and reduces the risk of wiring mistakes.
Universal fuse panels:
Great for custom builds, off-road rigs, camper vans, or race cars.
Ideal as an auxiliary fuse panel for lights, winches, fridges, inverters, and aftermarket accessories.
Usually requires:
Custom wiring to your battery junction block or main power cable
Custom mounting and grounding
Planning fuse sizes and circuit protection yourself
For a normal replacement in a regular car, I always recommend a direct-fit auto electrical fuse box. I use universal panels only when I’m adding circuits or building a custom setup.
Checking compatibility by VIN, year, make, and model
Fuse boxes are very specific. Even within the same model, a different year or trim can use a different panel. To avoid returns and headaches:
Always confirm:
Year, make, and model (example: 2018 Toyota Corolla)
Engine size and fuel type (1.8L petrol, 2.0L diesel, hybrid, etc.)
Body style and drive type (sedan, SUV, 4×4, etc.)
Transmission (manual vs automatic)
Use your VIN (Vehicle Identification Number):
The VIN is the most accurate way to find the correct auto electrical fuse box.
Most OEM parts catalogs and serious online platforms let you search by VIN.
Match the part number stamped on your existing fuse box whenever possible.
I never buy a replacement fuse box without cross-checking the part number or confirming compatibility with VIN. It’s the fastest way to avoid “almost fits but not really” parts.
Quality factors to look for
A fuse box is more than just plastic and fuses. Poor quality can cause bad connections, melted terminals, and intermittent power loss. I look for:
Solid plastic housing:
Heat-resistant, not thin and brittle.
Tight cover fit to keep out dust and water.
Clean, plated terminals:
No rough edges, no discoloration, no obvious corrosion.
Strong tension on fuse blades and relays (they should fit snug, not loose).
Proper bus bar design:
Internal connections rated for the correct amperage (especially for high-amperage circuits like starter, cooling fan, ABS, and fuel pump).
Good weather sealing:
For engine bay fuse boxes, look for seals or gaskets and solid latches.
Brand reputation:
For critical parts like a power distribution box or smart junction box, I avoid unknown brands with no support or reviews.
If you’re driving in very hot, cold, or humid climates (Middle East, Southeast Asia, Northern Europe, etc.), quality and sealing matter even more.
Warranty, returns, and support
A fuse box is not something you want to swap twice. Before I commit, I always check:
Warranty:
At least 12 months on OEM and serious aftermarket panels.
Longer warranty is a good sign the brand trusts its own product.
Return policy:
Clear, simple return or exchange if the part is not compatible or arrives damaged.
Check if installed electrical parts are still covered.
Technical support:
Ability to confirm fitment by VIN before you buy.
Access to basic wiring info or fuse box diagrams if needed.
Seller reliability:
Established seller or platform with a track record in auto electrical parts.
Clear contact details and customer service, not just a mystery listing.
In short: choose a replacement auto electrical fuse box that is direct-fit, VIN-verified, and backed by a solid brand and warranty. That way, you fix your electrical problems once and don’t have to worry about new ones.
Step-by-step auto electrical fuse box replacement
Replacing an auto electrical fuse box isn’t hard if you stay organized and work safely. Here’s how I handle a typical car fuse box replacement or power distribution box swap, step by step.
Safety first: battery disconnect procedure
Before you touch any auto electrical fuse box (interior or engine bay):
Turn everything off
Ignition OFF, key out (or push button off).
Lights, AC, audio, chargers all OFF.
Disconnect the battery
Open the hood and locate the battery.
Always disconnect the negative (–) terminal first.
Then disconnect the positive (+) terminal if needed.
Move both cables away from the posts so they can’t spring back.
Wait a few minutes
Give modules like the ECM, BCM, and airbag system time to power down.
This reduces the risk of short circuits and warning lights later.
Tools you’ll need for fuse box replacement
I keep it simple and use:
Basic socket set (metric and/or SAE)
Ratchet and short extension
Screwdrivers (Phillips + flathead)
Trim removal tools (plastic pry tools for dash panels)
Needle-nose pliers or fuse puller
Marker or masking tape (to label connectors if needed)
Phone camera (take reference photos)
Torque wrench (for main power and ground connections)
Work light or headlamp
Removing trim panels and accessing hidden fuse boxes
For cabin fuse boxes under the dash or behind panels:
Remove the small plastic cover or cabin fuse panel door (often under the steering wheel or at the side of the dash).
If it’s deeper:
Use trim tools to gently pry off side panels, lower dash panels, or kick panels.
Watch for hidden screws near the hood release, glove box, or side of the console.
For engine bay fuse boxes:
Pop the hood.
Release the clips on the engine bay fuse box cover.
Some cars have extra covers or ducting you’ll need to remove first.
Disconnecting wiring harnesses, clips, and mounting bolts
Once you see the auto electrical fuse box or power distribution box:
Take photos
Front, sides, and underneath.
Close-ups of each connector block and main cables.
Unbolt the fuse box
Remove mounting bolts or nuts holding the box to the body or bracket.
Unplug harnesses
Press the locking tab on each wiring harness and pull straight out.
Some connectors have:
Slide locks
Flip levers
Side tabs
If it fights you, stop and check for hidden locks—don’t force it.
Disconnect main power cables
Larger studs or bolts feed the fuse box.
Loosen carefully and remember where each cable goes.
Transferring fuses, relays, and connectors one by one
To avoid mix-ups, I move everything systematically:
Put the old fuse box next to the new fuse box on a clean surface.
Move fuses from old to new:
One at a time.
Same position, same fuse amperage rating and color.
Move relays the same way:
Match locations exactly.
Double-check:
No empty spots that were used before.
No swapped fuses (e.g., don’t replace a 10A with a 30A).
If your new box came pre-loaded, still compare with your old one and the fuse box diagram or fuse box cover legend.
Installing and securing the new fuse box
Once everything is transferred:
Mount the new fuse box
Set it in the same position as the old one.
Install mounting bolts or nuts finger-tight first, then snug them.
Reconnect wiring harnesses
Plug each connector into its matching socket.
Listen/feel for a solid “click” from the lock tabs.
Use your earlier photos to confirm positions.
Reconnect main power cables
Attach large power and ground cables to their correct studs.
Make sure the metal contact is clean and seated flat.
Reconnecting the battery and testing all circuits
After the auto electrical fuse box is bolted in and fully wired:
Reconnect the battery
Connect positive (+) terminal first.
Connect negative (–) terminal last.
Tighten both terminals firmly.
Key-on check
Turn the ignition to ON (don’t start yet).
Watch for:
Normal dash lights (ABS, airbag, check engine should cycle).
No smoke, no burning smell, no sparks.
Test key systems
Start the engine.
Check:
Headlights, indicators, brake lights
Radio, power windows, blower fan
Wipers, horn, charging system
For engine bay work, test cooling fan, fuel pump, starting, and charging.
If something doesn’t work, recheck the corresponding fuse and relay positions against the fuse box layout chart.
Torque specs and best practices for grounds and main power cables
Loose or overtightened connections at the fuse box can cause bad fuse box symptoms and intermittent faults.
Best practices:
Follow factory torque specs if available:
Battery and main power studs are often around 7–12 Nm (60–100 in-lb).
Always confirm for your exact year, make, and model.
Do not overtighten
You can crack plastic housings or strip studs.
Clean grounds
Lightly clean ground lugs and body metal with a wire brush if corroded.
Tight, clean grounds = fewer random electrical issues.
Final check
Gently wiggle large cables and connectors.
Nothing should move or feel loose.
Done right, a fuse box replacement restores stable power distribution, reduces electrical gremlins, and protects your car wiring harness and critical modules long-term.
Vehicle‑specific auto electrical fuse box layouts
When you’re chasing an electrical fault, the exact auto electrical fuse box layout matters more than anything. Same model, different year or trim can use a completely different fuse box diagram, so guessing usually wastes time.
Common fuse layouts for popular sedans
Most compact and midsize sedans (Camry, Corolla, Civic, Accord, etc.) use a similar split:
Toyota Camry / Corolla
Cabin fuse box (under dash): radio (RDO), power windows, interior lights, smart key, accessory sockets.
Engine bay fuse box: cooling fan, ABS, EFI/ECM, starter relay, A/C, main power.
Toyota often uses clear labels like ECU-B, RAD NO.1, IGN, P/OUTLET printed on the fuse box cover.
Honda Civic / Accord
Interior fuse panel usually low on the driver side, sometimes one extra box on the passenger side.
Controls: instrument cluster, sunroof, seat heaters, power mirrors, blower motor.
Engine bay power distribution box covers: alternator, main relay, ABS, fuel pump, cooling fans.
Honda labels: IG1, IG2, FUEL PUMP, FAN, BACK UP, etc. – match these with the fuse box legend.
For these sedans, comfort and convenience circuits are almost always in the cabin fuse panel, and high‑amperage circuits are in the engine bay fuse box.
Fuse box diagrams for trucks and SUVs
Larger vehicles usually have more than one automotive fuse panel and sometimes an extra battery junction block:
Users often post pictures of their fuse box layout chart and highlight the exact fuse they replaced.
YouTube and social media
Quick way to visually confirm: “[year] [model] fuse box location and diagram”.
Compare what you see in the video with your own auto electrical fuse box to be sure it matches.
If a diagram doesn’t line up with your car’s fuse count or positions, assume it’s the wrong year, engine, or region version and keep looking. Matching year + engine + trim is non‑negotiable if you want to avoid pulling the wrong fuse or chasing the wrong issue.
Upgrading your auto electrical fuse box and power distribution
If you’re adding gear like light bars, a fridge, a winch, or a sound system, the factory auto electrical fuse box usually isn’t enough. I always treat power distribution as a “do it once, do it right” job. It keeps your wiring safe, clean, and easy to troubleshoot later.
When to upgrade to a high-amperage or auxiliary fuse panel
You should look at a high‑amperage or auxiliary fuse panel when:
Sealed relays for engine bay and under‑chassis installs
Mount these away from direct spray, but still easy to reach on the trail or dock.
Adding a secondary fuse box for lights, winches, and accessories
Instead of tapping random factory wires, I prefer a secondary fuse box or auxiliary power distribution box:
Run a single heavy cable (with a main fuse near the battery) to the new fuse panel
Use that panel to feed:
Off‑road / work lights
Winch or recovery gear (often via a separate high‑amp breaker)
Fridge, radios, chargers
Air compressor, camp power, and other aftermarket accessories
This keeps all add‑on circuits in one place and protects your factory auto electrical fuse box from overload.
Safe ways to tap into existing power and grounds
Tapping into the existing system is where many DIY builds go wrong. I stick to a few rules:
Take main power directly from:
Battery positive terminal
Or a dedicated battery junction block / power lug
Always use a main fuse or breaker within 15–30 cm (6–12 in) of the battery
For grounds:
Use chassis ground points with clean, bare metal
Or run a dedicated ground cable back to the battery negative for high‑amp gear (winch, audio)
Avoid scotch‑locks and random “tap” connectors; use proper crimp lugs or sealed connectors
Planning fuse sizes and circuit protection
Each new circuit from your auxiliary or waterproof fuse box needs its own protection:
Match fuse size to wire gauge and load, not “whatever’s lying around”
As a simple guideline:
10A–15A for small lights, USB outlets
20A–30A for compressors, larger lights, fridge
40A+ for audio amps, big loads (use a relay and correct wiring)
100A+ for winches (usually via a dedicated high‑amp fuse or breaker)
Never “fix” a blown fuse by installing a bigger fuse. If it blows repeatedly, fix the wiring or downsize the load.
Cable routing, heat protection, and mounting tips
How you route and mount your automotive fuse panel and wiring matters as much as the parts themselves:
Routing
Keep cables away from exhaust, turbo, and sharp edges
Use loom, split conduit, or braided sleeve for protection
Follow factory harness paths when possible, and secure with clips/zip ties
Heat and abrasion protection
Add heat sleeve near hot engine components
Use grommets when passing through metal panels or the firewall
Keep cables clear of steering, pedals, and moving suspension parts
Mounting
Mount the auxiliary fuse panel on a solid, flat surface (metal bracket or firewall)
Keep it upright and accessible for quick fuse checks
For off‑road and marine setups, choose a shock‑resistant, sealed housing
Done right, upgrading your auto electrical fuse box and power distribution makes your vehicle safer, more reliable, and a lot easier to expand when you add the next accessory.
Auto electrical fuse box maintenance and prevention
Keeping your auto electrical fuse box in good shape saves you from random no-starts, dead accessories, and expensive electrical repairs. You don’t need pro tools for the basics—just a bit of attention and common sense.
Simple checks to keep your fuse box healthy
Do this every 6–12 months, or sooner if you drive in harsh conditions (heat, snow, rain, dust):
Pop the cover and inspect visually
Look for melted plastic, burnt smell, or brown/black marks around fuses and relays.
Check for loose fuses, relays, or connectors.
Gently wiggle fuses and relays
Everything should feel snug, not sloppy or wobbly.
If something is loose, that’s a red flag for overheating or poor contact.
Check the cover and seals
Make sure the fuse box cover closes fully and the rubber seal (if equipped) isn’t torn or missing.
A damaged cover is an open invitation for water and dust.
Protecting the fuse box from moisture and corrosion
Moisture is the #1 killer of engine bay fuse boxes and power distribution boxes, especially in rainy, coastal, or snowy regions.
Keep the cover on—always
Don’t drive or wash the car with the fuse box open.
Replace cracked or missing covers ASAP.
Avoid pressure washers directly on the fuse box
High-pressure water can push past seals and soak connectors.
Rinse the engine bay gently and keep clear of the fuse box and battery junction block.
Watch for early corrosion signs
Green/white crust, rust, or dull metal on terminals or screws = moisture problem.
If you see this in an engine bay fuse box, fix the leak source (cowl, windshield, hood seal) before it gets worse.
If your area gets heavy rain, flooding, or snow, a quick look at the engine bay fuse box after a big storm is worth the effort.
Cleaning contacts and using dielectric grease correctly
If you see light corrosion or dirty terminals on your automotive fuse panel, you can clean it up if the damage isn’t severe.
Basic cleaning process
Disconnect the negative battery terminal first.
Remove the affected fuse/relay gently.
Use electrical contact cleaner and a soft brush or cotton swab on the terminals.
Let everything dry completely before refitting.
Using dielectric grease (the right way)
Dielectric grease is insulating, not conductive. You don’t smear it on bare metal contacts.
Apply a thin film around the rubber seals of connectors and on the outside of terminals, not thick blobs on the contact landings.
It helps keep moisture and salt out, especially in engine bays and off-road builds.
If contacts are dark blue/black, pitted, or burnt, cleaning is usually not enough—that’s where we start talking fuse box replacement, not “revive and hope.”
Preventing overloading by matching fuse ratings
Overloading is how you turn a healthy auto electrical fuse box into a melted mess.
Never “upgrade” a fuse just because it keeps blowing
A 10 A blowing repeatedly and swapping it to 20 A doesn’t “fix” the problem—it just lets the wiring overheat.
Always replace with the same amperage and same color:
5A – Tan
10A – Red
15A – Blue
20A – Yellow
25A – Clear/white
30A – Green
Avoid stacking add-on fuses randomly
Cheap add-a-fuse setups into critical circuits (ECM, ABS, IGN) can overload the fuse box bus bars.
For extra loads like light bars, fridges, or winches, use a secondary fuse panel or auxiliary fuse box, not the cabin cig lighter circuit.
If a fuse keeps blowing, the problem is in the circuit (short, damaged wiring, bad component), not the fuse size.
When to proactively inspect the fuse box
Don’t wait for a complete electrical failure. After certain events, you should manually check your car fuse box even if everything seems “fine”:
After heavy rain, flooding, or deep water
If the interior got wet, check the under dash fuse box and cabin fuse panel for moisture, especially on carpets and kick panels.
If you drove through deep water, inspect the engine bay fuse box and check for condensation under the cover.
After off-roading or dusty/dirty conditions
Look for dust buildup, mud, or sand around wiring harnesses and fuse box covers.
Dust plus moisture equals corrosion over time.
After major electrical mods
Added off-road lights, winch, sound system, fridge, inverter, or air compressor?
Inspect the main power feeds, grounds, and fuse box connections to be sure nothing is overheating or overloaded.
A quick 5-minute inspection of your auto electrical fuse box after these situations can easily save you from chasing weird intermittent electrical issues later.
FAQ About Auto Electrical Fuse Boxes
Can a bad fuse box drain my car battery?
Yes. A failing auto electrical fuse box or smart junction box can cause:
Parasitic drains (modules staying “awake” when the car is off)
Shorted circuits that draw power all the time If you see repeated dead batteries and everything else checks out, have the fuse box and related wiring tested.
How much does it cost to replace an auto fuse box at a shop?
It depends on the vehicle and whether it’s a basic panel or an integrated control module:
Basic interior / engine bay fuse box:
Parts: ~$80–$300
Labor: ~$150–$350
Smart junction box / TIPM / power distribution center:
Parts: ~$300–$1,000+
Labor: ~$250–$600 (often includes programming)
High-end European cars and modern trucks sit at the upper end of that range.
Are aftermarket auto electrical fuse boxes reliable?
Good ones are. You want:
OEM-grade materials and copper bus bars
Solid terminals that match your factory harness
Clear labeling and cover legends
A real warranty and tech support
If you’re not sure who’s behind a product, check their background and manufacturing standards on their company overview page before you trust it with your vehicle’s power distribution.
How long does a fuse box replacement take for a DIYer?
For most DIYers with basic tools:
Simple under-dash or engine bay panel: ~1–3 hours
Smart junction box / TIPM with reprogramming: 3–6+ hours (plus dealer or specialist time for software)
The biggest time sink is usually labeling and swapping fuses/relays one by one so you don’t mix anything up.
Can I drive with a melted or cracked fuse box?
You shouldn’t. A damaged fuse box can cause:
Intermittent power loss while driving
Overheating and risk of fire
Sudden no-start or dead critical systems (fuel pump, ECM, ignition)
If you see melted plastic, burnt terminals, or a cracked housing with exposed bus bars, plan on repair or replacement immediately.
Do I need to reprogram anything after replacing a smart junction box?
On many late-model vehicles, yes. Smart junction boxes, TIPMs, and some power distribution boxes talk to the car’s CAN bus and may need:
Module coding / initialization
Key / immobilizer pairing
Option configuration (lighting, locks, etc.)
Check your service manual or a reliable FAQ like the one on the brand’s support page before you start, or budget for a shop to handle programming.
What’s the difference between a fuse box, power distribution box, and TIPM?
Fuse box / fuse panel: Holds fuses (and often relays) that protect individual circuits.
Power distribution box / battery junction block: Handles high-amperage feeds (starter, alternator, main fuses). Usually in the engine bay.
TIPM (Totally Integrated Power Module): Chrysler/Jeep/Dodge/RAM’s name for a smart power module that combines fuses, relays, and electronic control in one unit.
All do similar jobs, but smart boxes like TIPMs also “decide” when to power certain circuits.
How do I know if my problem is wiring, a relay, or the fuse box itself?
Use a simple checklist:
Likely the fuse: One thing stops working (radio, lighter, seat heater) and the fuse is visibly blown or has no continuity.
Likely the relay: Circuit clicks on/off sometimes, or works if you tap/swapped the relay with an identical one.
Likely the wiring:
Works when you move the harness
Only fails in rain or after hitting bumps
Visible damage, rubbing, or aftermarket hack wiring
Likely the fuse box:
Multiple unrelated circuits drop out
Melted/miscolored plastic around terminals
Loose fuse/relay sockets, or you can wiggle parts and make things cut in and out
A multimeter and a cheap test light will quickly tell you where power stops.
Is it safe to upgrade to a bigger fuse than stock?
No. Never oversize a fuse just to “stop it blowing.”
Fuses are sized to protect wiring, not the device.
A larger fuse can let the wiring overheat and melt before it blows.
If a circuit blows the correct fuse repeatedly, you have a fault (short, overload, or failing component), not a fuse problem.
What should I check first if there’s no power to accessories but the car starts?
Run through these in order:
Accessory / ACC and IGN fuses in the interior fuse box
Cigarette lighter / power outlet fuse (many dashboards and radios share this feed)
Radio, BCM, and cluster fuses (look for labels like RDO, BCM, CLSTR, ACC, IGN)
Grounds under the dash and around the battery/fuse box
The accessory relay (often in the interior or engine bay fuse panel)
If all fuses are good and powered on one side only, or multiple accessories are out at once, you may be dealing with a failing auto electrical fuse box or smart junction box.
Navigating the intricate world of electrical power distribution, one quickly encounters the indispensable role of low voltage switchgear. But what exactly is ‘low voltage switchgear,’ and why should it matter to manufacturers and industrial clients alike? Simply put, it’s the electrical equipment responsible for controlling, protecting, and isolating electrical circuits at low voltage levels — […]
What Is an Electrical Fuse Box? If you’re worried about that old electrical fuse box in your home, you’re not alone. Many older houses still rely on fuse boxes instead of modern breaker panels, and it’s normal to wonder if they’re safe, legal, or overdue for an upgrade. Let’s start with the basics so you […]
What Is a Medium Voltage Circuit Breaker? A medium voltage circuit breaker (MV CB) is a switching and protection device designed to safely interrupt electrical currents in the 3.6–40.5 kV range. In plain terms, it’s the safety valve of a medium voltage network: it detects faults, cuts power in milliseconds, and allows you to switch and isolate equipment without putting people […]
We use cookies to enhance your browsing experience, serve personalised ads or content, and analyse our traffic. By clicking "Accept All", you consent to our use of cookies.