How an Electrical Fuse Box Works
If you’ve got an old house fuse box, you’re dealing with simple but serious hardware. A fuse box does one main job: it lets electricity into your home and then protects each circuit by “sacrificing” a fuse when something goes wrong.
When a circuit overloads or shorts out, the fuse melts internally and opens the circuit. Power stops flowing before the wires overheat and start a fire. That’s the entire safety concept behind electrical fuse box wiring.
Main Components in a Fuse Box
Most residential fuse panels share the same basic parts:
If you open your old house fuse box and don’t clearly see a solid grounding path, that’s a strong reason to bring in a licensed electrician.
Cartridge Fuses vs Screw‑In Edison‑Base Fuses
You’ll usually see two main fuse styles in a legacy fuse panel:
The big risk with Edison‑base fuses is overfusing: someone puts in a 30A fuse on wiring only rated for 15A just to “stop the fuse from blowing.” That’s a fire hazard, not a fix.
Type S Fuses and Tamper‑Proof Adapters
To prevent overfusing, the industry created Type S fuses and Type S adapters:
Type S adapters
- Thread into the old Edison‑base socket one time.
- Sized by amp rating (15A, 20A, 30A).
- Once installed, they physically block larger fuses from screwing in.
Type S fuses
- Plug into the matching adapter instead of directly into the original socket.
- Each fuse only fits the correctly sized adapter.
- They lock the circuit into the proper maximum fuse size.
If you have an older panel with mixed and mismatched screw‑in fuses, installing Type S fuse adapters and matching Type S fuses is one of the simplest upgrades to improve safety without changing the whole fuse box.
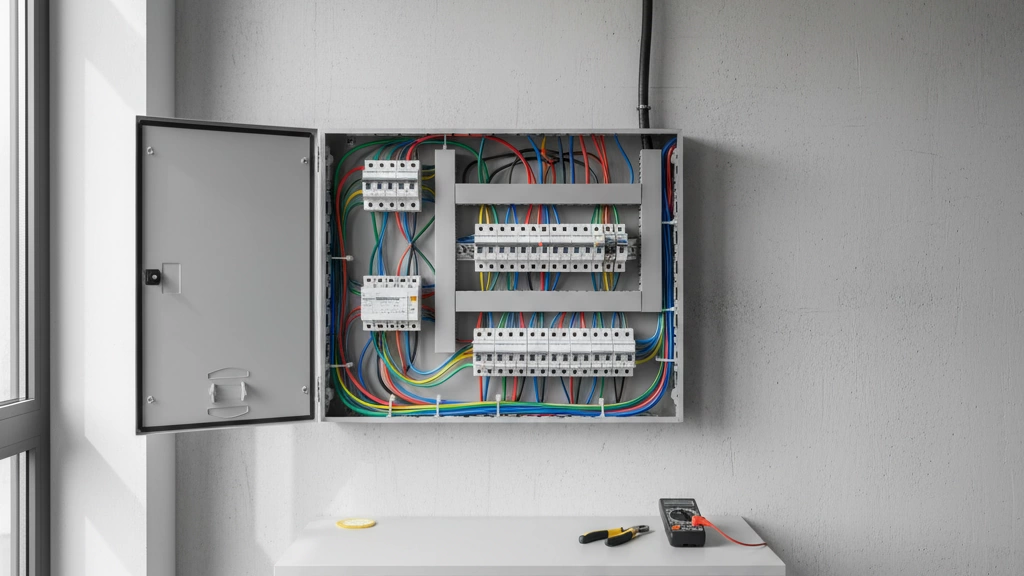
Basic Fuse Box Diagram and Labeled Parts
Here’s a simple way to picture a residential fuse panel layout:
- Service entrance cable enters from the meter into the fuse box.
- Main fuse block / main cartridge fuses at the top control power to the panel.
- Hot bus bars distribute power to:
- Branch circuit plug fuses (screw‑in or Type S) for 120V loads.
- Cartridge fuse holders for 240V and heavy appliances.
- Neutral bar holds all the white wires from each circuit.
- Ground bar / bonding connects bare or green grounding conductors to:
- The metal panel enclosure.
- The house grounding system (ground rods, water pipe, etc.).
In a quick sketch, you’d label:
- Line in: service cables from the utility.
- Main fuse block: top center or top side.
- Branch circuit fuses: rows of screw‑in fuses.
- Neutral bar: one side, full of white wires.
- Ground path: bare/green wires and bond to the panel and grounding electrode.
If any of these parts look burned, melted, loose, or rusted, don’t keep experimenting. Stop, leave the panel cover on, and call a licensed electrician to inspect it before you touch anything else.
Common electrical fuse box wiring layouts
When you open an electrical fuse box in an older home, the wiring layout usually tells you a lot about the age of the system, service size, and how safe it is. I always look at four things first: service rating (60A vs 100–150A), how the main fuse block is arranged, how the branch circuit fuses are grouped, and what wire sizes/colors are present.
Typical 60 amp fuse panel in old houses
A classic 60 amp fuse panel in an old house usually looks like this:
- 2 main cartridge fuses (often 60A) in a pull‑out block at the top
- 4–8 screw‑in branch circuit fuses (15A or 20A) below
- Neutral bar in the middle or side, often with uninsulated (bare) copper neutrals
- Grounding may be minimal or missing, especially with knob and tube wiring
Typical features:
- Feed: 60A service entrance cable, often cloth‑covered
- Branch circuits: 14 AWG copper on 15A fuses, 12 AWG copper on 20A fuses
- 240V loads (if any) sometimes tapped awkwardly or not present at all
Panels like the ones I’m describing match a lot of what’s covered in this overview of old house fuse boxes and safety issues.
100–150 amp fuse panels in transitional homes
In “transitional” homes (roughly 1960s–1980s), you might see a larger 100 amp fuse panel or even a 150 amp fuse panel before breakers became standard:
- Pair of large cartridge fuses (100A–150A) for the main
- Multiple cartridge fuses for 240V loads (range, dryer, A/C)
- More screw‑in fuses for 120V branch circuits, often 8–16 spaces
- Better grounding and bonding, sometimes a separate ground bar added later
Expect:
- 4 AWG–2 AWG copper or 2/0 aluminum for the main service
- Mix of older 2‑wire (no ground) and newer 3‑wire (with ground) branch circuits
- More 240V circuits for big appliances
Service entrance cable to meter to main fuse block
The basic residential fuse box wiring path is simple:
- Service entrance cable from utility drop or underground feed
- Into the meter socket outside (or near) the home
- From the meter to the main fuse block inside the panel
- Out from the main onto the hot bus bars, feeding:
- Cartridge fuses for 240V circuits
- Screw‑in plug fuses for 120V branch circuits
Neutral from the service goes to the neutral bar, and from there to each circuit. Grounding conductors either bond to the same bar (in old panels) or to a separate ground bar tied to grounding electrodes (rods, water pipe).
For a high‑level comparison of how these layouts differ from modern breaker gear, I’ve written more in this fuse box vs circuit breaker panel guide: electrical fuse box vs circuit breaker.
Wire gauge and color coding you’ll see in a fuse box
Wire sizes and colors are a big clue to how correctly the panel is fused:
Typical wire gauges:
- 14 AWG copper – 15A circuits (lighting, general outlets)
- 12 AWG copper – 20A circuits (kitchen, bath, laundry receptacles)
- 10 AWG copper – 30A circuits (dryer, some A/C)
- 8 AWG / 6 AWG copper – 40–60A circuits (ranges, large A/C)
- Larger sizes or aluminum – main feeds and big 240V loads
Common color coding (newer work):
- Black / Red – hot conductors
- White – neutral
- Green or bare copper – equipment ground
In many old fuse panels, you’ll see:
- All black or cloth‑covered cable with no clear color coding
- White used as hot in some 240V circuits (should be re‑identified with tape)
- No separate ground, only neutrals and sometimes bonding to metal conduit or water pipe
If the fuse size doesn’t match the wire gauge (for example, a 30A fuse on 14 AWG or 12 AWG), that’s a red‑flag overfusing hazard and a reason to bring in a licensed electrician immediately.
Fuse types in a home electrical fuse box wiring
When you open an old house fuse box, you’ll usually see two main types of fuses: plug fuses and cartridge fuses. Knowing which is which—and what size is safe—matters more than people think.
Plug fuses: 15A, 20A, 30A
Most lighting and outlet circuits in a legacy 60 amp fuse panel, 100 amp panel, or 150 amp panel use screw‑in plug fuses:
- 15A plug fuses – typically for lighting and general outlets
- 20A plug fuses – for circuits wired with heavier wire (kitchen, small appliances)
- 30A plug fuses – for dedicated loads only (like older dryers or water heaters)
Fuse size must match the wire size and circuit rating. Overfusing (for example, a 30A fuse on a 15A circuit) is a serious fire risk.
If you want a quick overview of the main residential fuse types and ratings, I’ve broken them down clearly in this guide on types of electrical fuse.
Edison‑base vs Type S plug fuses
You’ll see two styles of screw‑in fuses in a home fuse box:
If you’re keeping a fuse panel in service, converting Edison‑base to Type S fuses is one of the smartest safety upgrades you can make.
Cartridge fuses for mains and 240V circuits
The heavy work in an old house fuse box is handled by cartridge fuses:
- Used in the main fuse block (the big pull‑out section that feeds the whole panel).
- Also used for 240V circuits: older ranges, well pumps, large AC units, and some dryers.
- Available in higher amp ratings (30A, 60A, 100A and up) depending on the service and load.
These usually slide or clip into holders and must be fully de‑energized before you touch them—this is not the place to “just wing it.”
Time‑delay vs fast‑acting fuses
Not every fuse blows at the same speed. In residential fuse box wiring, you’ll typically run into:
Matching the right fuse speed to the load makes a big difference in nuisance blowing vs safety.
If you want a deeper comparison of time‑delay vs other fuse behaviors alongside breakers, I’ve summed that up in my piece on electrical fuses and circuit breakers.
Unsafe “rejects”: pennies and oversized fuses
In older fuse panels, the most dangerous issues I see aren’t the panels themselves—it’s the “repairs”:
Pennies or metal objects behind plug fuses
- This completely bypasses the fuse.
- The circuit can pull far more current than the wires are designed for, turning the cable in the wall into a heater.
- This is a major fire hazard. If you see this, stop using the circuit and call a licensed electrician.
Oversized fuses (overfusing)
- Example: 30A fuse on a 14‑gauge/15A circuit.
- The breaker/fuse is now protecting nothing—the wire becomes the weak link and can overheat long before the fuse blows.
“Temporary” fixes that never got undone
- Any mismatch between fuse rating and wire size
- Multiple circuits doubled up under one fuse to “save space”
In a legacy fuse panel, the rule is simple:
Correct fuse size only, no improvised conductors, and no “it seems fine” shortcuts. If you’re not sure what belongs where, that’s the line where a pro needs to step in.
Step‑by‑step: Replacing a Blown Fuse in an Electrical Fuse Box
Replacing a blown fuse in an electrical fuse box is simple if you do it safely and use the right parts. Here’s a clear walkthrough you can actually follow at home.
Tools You Need Before You Start
Have everything ready so you’re not hunting for tools with the panel open:
- Insulated screwdriver (if the cover uses screws)
- Flashlight or headlamp
- Replacement plug fuse or cartridge fuse of the correct amp rating
- Multimeter or non‑contact voltage tester
- Dry gloves and dry shoes (no standing on concrete with bare feet)
If you’re unsure what type of fuse or panel you have, it helps to first look over a simple fuse electrical panel overview so you know what you’re dealing with.
Safety Checks Before Touching the Fuse Box
Before you touch anything in an old fuse panel:
- Make sure your hands are dry and you’re standing on a dry, stable surface.
- Turn off or unplug the device or appliance that lost power.
- If there’s any burning smell, melted plastic, or visible arcing, stop and call an electrician.
- Only remove the deadfront cover if you know what you’re doing—live parts may be exposed behind it.
If you feel nervous or the box looks damaged, do not push it. Safety beats saving a few dollars.
How to Find Which Fuse Is Blown
Most old house fuse boxes use plug fuses (screw‑in) for branch circuits and larger cartridge fuses for the main:
Look for the dead circuit
- Which lights or outlets don’t work? That tells you which area/circuit to check first.
Visually check plug fuses
- Many plug fuses have a glass window. A blown one often shows:
- A broken or melted metal link
- Black or cloudy glass
Check for loose or discolored fuse holders
- A fuse that runs hot can darken the holder or feel warm. That’s a warning sign of trouble.
How to Test a Fuse With a Multimeter
If it’s not obvious by looking:
Set the multimeter
- Switch to continuity mode or the lowest ohms (Ω) range.
Test a plug fuse (out of the panel)
- Remove the fuse by turning it counterclockwise.
- Touch one probe to the bottom center contact and the other to the threaded metal shell.
- Reading:
- Beep or near‑zero ohms = good fuse
- No beep / “OL” / very high resistance = blown fuse
Test a cartridge fuse
- Pull the cartridge fuse or pull‑out block straight out by the handle.
- Touch one probe to each metal end of the fuse.
- Same rule: continuity = good, no continuity = blown.
How to Install the Correct Replacement Fuse
You must match fuse rating to wire size and circuit. Overfusing is a fire risk.
Check the amp rating
- Read the label near the fuse holder or on the panel cover.
- Typical plug fuse ratings: 15A, 20A, 30A.
- Never install a higher‑amp fuse “so it stops blowing.” That’s how fires start.
Use the proper type
- Edison‑base fuses screw into older holders.
- Type S fuses screw into Type S adapters only and help prevent oversizing.
- For mains or 240V circuits, use the proper cartridge fuse type and rating.
Install the fuse
- For plug fuses:
- Insert straight and screw in clockwise by hand until snug. Don’t overtighten.
- For cartridge fuses:
- Place the new fuse into the pull‑out block or clips fully and evenly.
Restore power and test
- Turn devices back on one at a time.
- Check that lights and outlets on that circuit now work normally.
What to Do if the Same Fuse Keeps Blowing
If a fuse blows again shortly after you replace it, there’s a deeper problem:
- Unplug everything on that circuit, then replace the fuse and try again:
- If it holds with everything unplugged, you likely have a bad appliance or overloaded circuit.
- If it still blows with everything unplugged, you may have a short circuit or wiring fault.
Stop replacing fuses repeatedly—this isn’t just a nuisance, it’s a warning. At this point:
- Do not increase the fuse size.
- Do not bypass the fuse with pennies, foil, or makeshift “fixes.”
- Call a licensed electrician to check the wiring, especially if you have knob‑and‑tube or aluminum wiring.
If you want a deeper dive into why fuses trip and how different fuse styles behave, you can also review a general guide on fuse tripping behavior and basics.
Troubleshooting common electrical fuse box wiring problems
When an old house fuse box acts up, it’s usually trying to warn you. I’ll keep this simple and focused so you know what’s serious and what you might safely reset.
Frequent blown fuses on one circuit
If the same fuse keeps blowing, you likely have:
- Overloaded circuit – too many devices on one line (heaters, microwaves, hair dryers).
- Wrong fuse size – for example, a 30A fuse on 14‑gauge wire is a fire risk, not an upgrade.
- Damaged wiring or outlets – loose connections, old receptacles, or worn cords.
What to do:
- Unplug high‑draw appliances and spread them to other circuits.
- Make sure the fuse matches wire size (never “oversize” a fuse).
- If it blows again with minimal load, call a licensed electrician. That’s no longer a DIY problem.
No power to part of the house
When one section of the house goes dark:
- Check for a blown branch circuit fuse in the fuse box.
- If multiple rooms are out on both sides of the panel, the issue might be a main fuse, pull‑out block, or service issue.
- For a single big appliance like a dryer, a blown fuse might be masking a deeper fault, similar to a bad thermal fuse in the dryer itself, as covered in these GE electric dryer thermal fuse guides.
If you replace the correct fuse and it blows again or the area stays dead, stop there and bring in a pro. You may have a failing main, damaged bus bar, or service drop issue.
Overheating, buzzing, or burning smell at the fuse box
This is critical. Signs include:
- Fuse holders that are hot to the touch
- Buzzing, crackling, or sizzling sounds
- Burning plastic or insulation smell
- Discoloration or charring around fuse bases
Shut off power if you can safely do it and do not keep replacing fuses in an overheating panel. This usually means loose connections, corroded contacts, or failing components that can start a fire. Call an electrician immediately.
Lights flicker when big appliances turn on
Flickering when a fridge, AC, or dryer starts points to:
- Undersized service (common on 60 amp fuse panels)
- Loose neutral or hot connections at the panel or meter
- Overloaded branch circuits
Mild, momentary dimming can happen, but noticeable or frequent flicker is a red flag. An electrician should check the panel, neutral bar, and service entrance wiring.
Fuse blows instantly when replaced
If a fuse pops the moment you screw it in or push in a cartridge:
- You likely have a direct short – damaged wire, failed device, or miswired outlet.
- Turn the circuit off, unplug everything on that circuit, and try again only once.
- If it still blows instantly with everything disconnected, stop and call a pro. You’re dealing with shorted wiring, not just overload.
Main fuse or pull‑out block keeps failing
A main fuse or pull‑out block blowing repeatedly means:
- The entire service is overloaded for the house’s needs.
- There may be a faulty main fuse block, deteriorated lugs, or failing service cable.
- Sometimes a failing large appliance (like a dryer with internal shorts, similar to issues covered in this general dryer thermal fuse breakdown) can trip or blow mains.
Do not keep upsizing the main fuse. If a main keeps failing, you’re past DIY territory and probably heading toward a service upgrade and full panel evaluation.
Grounding issues in knob‑and‑tube or older wiring
With legacy knob‑and‑tube or early cable:
- Many circuits have no ground at all.
- Bootleg grounds (jumpers from neutral to ground) are dangerous and a code violation.
- Old fuse panels may not have proper grounding and bonding to water pipes or ground rods.
Signs of grounding problems:
- Tingling shocks from metal appliances
- Weird behavior with surge protectors or electronics
- Metal boxes with no ground wire present
If you see knob‑and‑tube mixed with a fuse box, treat the system as high‑risk. Have an electrician inspect grounding, bonding, and overall capacity before you rely on it for heavy modern loads.
DIY limits on electrical fuse box wiring
With electrical fuse box wiring, I draw a hard line between simple, low‑risk tasks and anything that can burn a house down or void insurance.
When you should NOT DIY
Stop immediately and call a licensed electrician if you see:
- Visible damage
- Melted or discolored bus bars
- Scorched or brittle insulation on any wire
- Loose, wobbly, or cracked fuse holders
- Signs of arcing (pitting, black marks, sizzling/buzzing)
These point to overheating and bad connections, not just a blown fuse. That’s a fire risk, not a DIY project.
Aluminum wiring in a fuse box
Aluminum wiring needs special connectors and anti‑oxidant compound. Wrong repairs cause loose, overheating joints. Only a pro should:
- Tighten or terminate aluminum conductors
- Install AL‑rated breakers/panels or connectors
- Evaluate whether a partial or full rewire is needed
Rust, water, or corrosion in the panel
If the fuse box is damp, rusty, or corroded:
- The metal parts may not carry current safely
- Grounding and bonding might be compromised
- The enclosure may need full replacement, not “cleaning”
Water and electricity together are a strict “call an electrician” situation. Often the source is a bad meter socket, roof leak, or failed seal at the service entrance that needs professional work, similar to how outdoor systems rely on sealed low-voltage power distribution cabinets to stay dry and safe.
Insurance, inspections, and forced panel upgrades
You should bring in a pro promptly if:
- Home insurance flags your fuse box
Many insurers either:- Charge more for an old fuse panel
- Require a licensed electrician’s written report
- Push for a breaker panel upgrade before renewal
DIY changes here can actually void coverage if there’s a fire and they find unpermitted or unlicensed work.
- Home inspection calls out your old house fuse box
In a sale or refinance, an inspector might note:- “Legacy fuse panel – recommend evaluation”
- “Evidence of overfusing/unsafe modifications”
- “Corrosion, aluminum wiring, or improper grounding”
At that point, you want a licensed contractor to:
- Inspect the entire system (service entrance, meter, panel, grounding)
- Document code issues and hazards
- Quote a fuse box upgrade or full panel replacement
Simple tasks most homeowners can do safely
Stick to very basic jobs only, and only if you’re comfortable:
- Replacing a single blown plug fuse with:
- The same amperage rating
- The correct type (Type S vs Edison‑base, time‑delay if required)
- Resetting GFCI outlets (if present) on old circuits, not opening the panel.
The moment you see anything that looks burned, corroded, wet, or altered by previous owners, or if fuses keep blowing with no clear cause, it’s time for a professional inspection of your old house fuse box—no exceptions.
Upgrading a fuse box to a breaker panel
If your home still runs on an old electrical fuse box, upgrading to a modern breaker panel isn’t just a “nice to have” – it’s usually a safety and insurance requirement once you start adding big loads (EV charger, heat pump, induction range, etc.). I treat fuse‑to‑breaker upgrades as a full system refresh, not a quick patch.
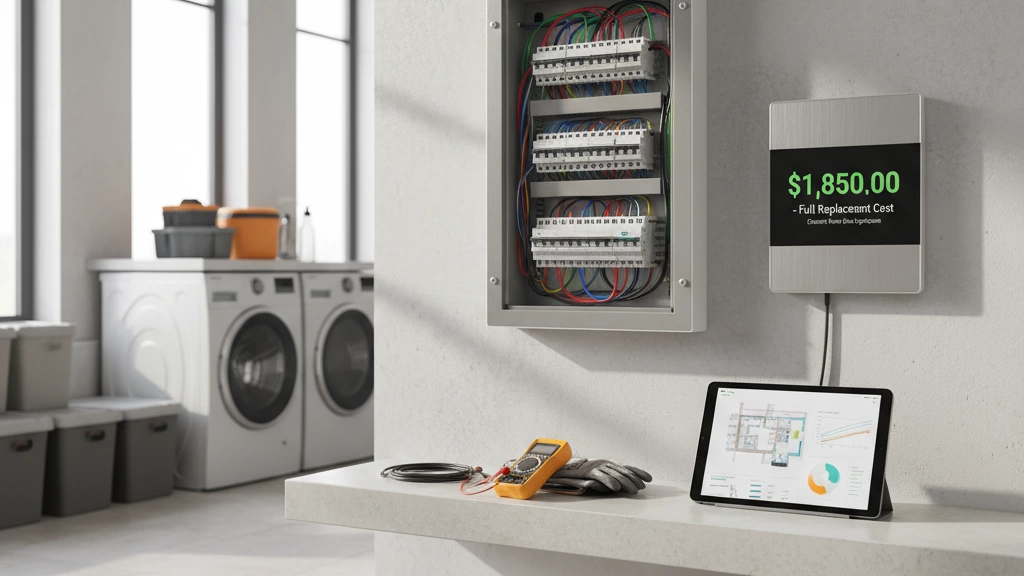
Average fuse box upgrade cost by region
Exact pricing depends on labor rates, permit fees, and how easy your service is to access, but here’s a realistic ballpark for a full panel replacement, not just a swap of the metal box:
- US & Canada
- 60A → 100A: $1,500–$3,000
- 60A/100A → 200A: $2,500–$5,500+ (more if trenching or long service runs)
- UK & EU
- Old fuse board → modern consumer unit: typically €800–€2,000 / £700–£1,800
- Australia / NZ
- Fuse box → safety switch/RCD board: AU$1,500–$3,500
Costs jump if:
- The meter or service mast also needs replacement
- Walls/finishes must be opened and repaired
- There’s aluminum wiring remediation or serious code issues
What a full electrical panel replacement includes
A real upgrade is more than “new breakers”:
- New breaker panel sized for today’s loads (often 30–40+ spaces)
- Replacement of the main disconnect / main breaker
- New meter socket and service entrance cable if required
- Proper grounding and bonding (ground rods, water pipe bond, bonding jumpers)
- Labeling of all circuits, tightening/torquing all connections
- Code‑compliant arc‑fault / ground‑fault protection where required
- Removal or safe isolation of the old fuse box and cleanup
For industrial and utility applications where higher voltages are involved, I lean on technologies similar in concept to our residential panels but built for grid‑level duty, like outdoor high‑voltage vacuum circuit breakers such as the ZW32‑12G T630/20 outdoor AC high‑voltage vacuum circuit breaker.
Service size upgrades: 60A to 100A or 200A
Most older fuse panels are 30–60 amps, which is far below what a modern home actually uses.
Typical targets:
- 100A service
- Works for small homes/apartments with gas heat and gas water heating
- 150A–200A service
- The sweet spot for most detached homes
- Strongly recommended if you have or plan: EV charger, electric range, heat pump, hot tub, workshop tools
A proper service upgrade usually includes:
- New service drop or lateral (utility side) if needed
- Larger service conductors and meter base
- Load calculation to match service size to your real usage
Permits, inspections, and utility coordination
You absolutely cannot treat a panel change like a DIY weekend project:
- Permit from the local authority is almost always required
- Utility coordination so they can disconnect/reconnect service
- Rough and/or final inspection to verify:
- Proper breaker sizing vs wire gauge
- Grounding, bonding, and working clearances
- Correct labeling and AFCI/GFCI locations
Without the paperwork, you risk fines, denied insurance claims, and trouble when selling the house.
Possible insurance discounts after upgrading
Insurers don’t love old fuse boxes, especially paired with:
- Knob‑and‑tube wiring
- Aluminum branch circuits
- Overfusing history (wrong fuse sizes)
Once you upgrade:
- Some carriers remove underwriting restrictions or surcharges
- You may qualify for small premium discounts, especially if you also add:
- AFCI/GFCI protection
- Surge protection
- Documented electrical inspection
Always ask your insurer before the project what documentation they want (invoice, photos, inspection report).
How an electrical contractor handles panel replacements
When I manage a fuse‑to‑breaker upgrade, the flow is usually:
Site visit & load assessment
- Inspect existing fuse box, wiring, grounding, and meter
- Discuss future loads (EV, mini‑split, workshop, etc.)
- Decide on service size and panel capacity
Quote, permits, and scheduling
- Provide a line‑item estimate (panel, meter, grounding, labor)
- Pull permits and request utility shut‑off window
Panel replacement day (typically 4–8 hours without power)
- Shut off power at the meter or service disconnect
- Remove old fuse box and unsafe wiring splices
- Install new panel, re‑terminate circuits, label everything
- Upgrade grounding and bonding
Inspection and utility reconnection
- Inspector signs off
- Utility restores power
- Final walkthrough with the homeowner on breaker locations and labeling
If you’re seeing frequent fuse problems, planning big new loads, or facing insurance pressure, upgrading your electrical fuse box wiring to a modern breaker panel is usually the smartest long‑term move—for safety, resale, and peace of mind.
Fuse box vs breaker panel comparison
When people talk about electrical fuse box wiring today, what they usually want to know is whether it’s time to ditch the old fuse panel and move to a modern breaker panel. Here’s how I look at it as a homeowner and as someone who treats panels like core infrastructure, not a “maybe later” upgrade.
Safety differences between fuses and breakers
Fuses are very safe on paper – they react fast and protect wiring well when correctly sized. The problem is the human factor:
- It’s easy to over‑fuse (for example, putting a 30A fuse on 14 AWG wire). That turns a safety device into a fire risk.
- Old fuse boxes often lack proper grounding and bonding, which undercuts the built‑in safety of the fuse itself.
- Fuse holders and bus bars in legacy panels loosen, corrode, and overheat with age.
Breaker panels add layers of safety that fuse boxes usually don’t have:
- Built‑in support for GFCI and AFCI breakers, required by modern code in many areas.
- Better short‑circuit and overload protection with easier coordination to wire size and load.
- Cleaner grounding, bonding, and labeling, especially after a full electrical panel replacement.
If you’re dealing with medium‑voltage gear in a commercial or industrial setting, modern medium‑voltage circuit breakers are the standard for a reason: predictable performance, testing options, and clear safety margins. The same logic scales down to why I prefer breaker panels in homes.
Convenience: reset vs replace
With a fuse box:
- A blown fuse means power is out until you find and replace the fuse.
- You need spare plug fuses or cartridge fuses on hand at all times.
- In the dark, reaching into a cramped old panel is nobody’s idea of fun.
With a breaker panel:
- You usually just flip the tripped breaker back on after fixing the cause.
- No hunting for compatible fuses or Type S adapters.
- Easier for guests, tenants, or family to understand and manage safely.
For daily use, the reset vs replace difference is huge.
Capacity and room for future circuits
Most old house fuse boxes were built for smaller, simpler homes:
- Common service sizes: 60 amp fuse panel or maybe 100 amp fuse panel.
- Very limited spaces for new branch circuits.
- Modern loads (EV chargers, heat pumps, hot tubs, big ranges) just don’t fit comfortably.
Modern breaker panels:
- Often start at 100A and go up to 150A or 200A service upgrades.
- Include plenty of breaker spaces and options like tandem breakers (where allowed).
- Make it realistic to add circuits for home offices, HVAC upgrades, and EV chargers without hacking the system.
If you plan any serious renovation or new loads, I design for a breaker panel with extra capacity from day one.
Maintenance and troubleshooting differences
Fuse panels are harder and messier to keep safe long‑term:
- Loose fuse holders, overheating fuse blocks, and corroded connections are common.
- Finding which fuse is feeding what can be a guessing game if nobody labeled anything.
- Diagnosing issues like “no power in half the house” often means digging through old, mixed wiring methods.
Breaker panels:
- Have clear breaker handles and labeling, making troubleshooting faster.
- Make it easier to isolate circuits without pulling fuses under load.
- Are more compatible with modern test tools and inspection routines.
From a maintenance cost and time standpoint, a breaker panel wins every time.
Which panel type insurers and inspectors prefer
Most insurers and home inspectors:
- Are wary of old fuse panels, especially 60A services, ungrounded systems, or known problematic brands.
- May require a breaker panel upgrade as a condition of coverage, refinancing, or sale.
- Treat a modern breaker panel as a marker of reduced fire risk and better compliance with NEC‑style electrical code.
In a lot of markets, upgrading from a legacy fuse box to a breaker panel isn’t just about convenience; it’s about keeping insurance options and property value open. When I look at long‑term cost and risk, I treat a breaker panel upgrade as a core investment, not a cosmetic upgrade.
Electrical safety and code basics for fuse boxes
If you’re dealing with electrical fuse box wiring in an older home, you’re really juggling two things: staying safe today and keeping inspectors, utilities, and insurers happy tomorrow. Here’s what actually matters.
Key NEC rules that affect old fuse panels
Even if your old house fuse box predates the current NEC (National Electrical Code), any new work has to meet current rules. Big ones:
- Correct fuse size vs wire size (no “overfusing”)
- Proper grounding and bonding of the service
- Working clearances around the panel (no closets, no blocked access)
- No mixed neutrals/grounds on the wrong bars in subpanels
- No DIY bypasses like jumpers, pennies, or doubled‑up circuits under one fuse
When I spec modern switchgear for bigger systems (like our medium‑voltage ring main units), I’m following the same core principles—correct protection, proper clearances, and clean grounding.
Grounding and bonding requirements
Grounding and bonding are what keep fault current away from you and toward the fuse:
- Main bonding jumper connects neutral to ground at the main service only
- Grounding electrode system (ground rods, water pipe, UFER, etc.) must be present and properly sized
- Equipment grounding conductors (EGCs) should be run with branch circuits, not “borrowed” from random pipes
- In old knob and tube wiring and fuse box setups, you’ll often see no ground at all—this is a red flag, especially for 3‑prong outlets and metal fixtures
If your legacy fuse panel has no obvious ground bar or only sketchy bonding to a rusted pipe, it’s time for a professional inspection.
GFCI and AFCI protection on older circuits
Code now expects extra protection in many areas, even with an old 60 amp fuse panel or 100 amp fuse panel:
- GFCI (Ground‑Fault Circuit Interrupter)
- Required for bathrooms, kitchens, laundry, outdoor, garages, basements, and near sinks
- You can usually add GFCI receptacles on old circuits even if the panel is a fuse box
- AFCI (Arc‑Fault Circuit Interrupter)
- Required on many bedroom and living area circuits in new work
- In fuse systems, this is usually done via AFCI receptacles or a new subpanel with breakers
No inspector is thrilled by an untouched old house fuse box with zero GFCI/AFCI on high‑risk circuits.
Why improper fuse sizing is a code and safety issue
“Overfusing” is one of the biggest problems in residential fuse box wiring:
- 15A circuit with 14 AWG wire must not have a 20A or 30A fuse
- Oversized fuses let the wire cook without blowing — this is how you get hidden overheating fuse holder issues, scorched insulation, and fires
- Using Type S fuse adapters is one of the only safe ways to lock in the correct size
If you see a bunch of 30A screw‑in fuses home for lighting and outlets, that panel is not just “old” — it’s unsafe.
Liability and insurance concerns with DIY fuse work
From a business and risk point of view, this is where it gets serious:
- Many insurers view old electrical panel safety (especially fuse boxes) as an elevated fire risk
- DIY changes to an electrical fuse box wiring setup can void coverage if there’s a fire tied to bad work
- Unpermitted electrical service upgrades or homemade breaker panel upgrade projects are easy for inspectors to spot
- If you’re renting or running a small business from home, non‑compliant panels can become a liability issue, not just a “fix it later” problem
When the panel is rusty, overloaded, or clearly hacked, I strongly recommend a licensed electrician and a proper electrical panel replacement, with permits and inspections. It protects your house, your wallet, and your insurance position.
FAQ about electrical fuse box wiring
Can I convert a fuse box to breakers?
Yes, but it’s not a DIY job. Converting a legacy fuse box to a modern breaker panel usually means:
- Replacing the entire panel
- Upgrading the main service (often to 100A or 200A)
- Bringing grounding, bonding, and GFCI/AFCI protection closer to current code
A licensed electrician handles permits, utility coordination, and inspection. In many regions, insurers and inspectors strongly prefer a breaker panel over an old fuse panel, and a compliant upgrade can sometimes help with insurance approval.
Is it safe to change a fuse myself?
It can be, if:
- You turn off the main before touching anything
- You replace with the same amp rating (never “go bigger”)
- You don’t touch any exposed metal parts or wiring
If the fuse keeps blowing, the holder is hot or discolored, or you see any burning/arched marks, stop and call an electrician. At that point, you’re not just “changing a fuse”; you’re dealing with a deeper wiring or load problem