If your GE electric dryer isn’t heating or suddenly seems completely dead, there’s a good chance the thermal fuse is involved. I’ll walk you through what this little part does, why GE makes it “one‑time use,” and how it differs from the other temperature parts in your dryer.
What the thermal fuse does in a GE electric dryer
The thermal fuse is a safety device. Its only job is to cut power when the dryer overheats.
In simple terms:
The dryer gets too hot (usually from poor airflow or a vent problem).
The thermal fuse “blows” (opens the circuit) at a specific temperature.
Power to the heating circuit or sometimes the entire dryer is cut off.
Result: dryer runs but no heat or dryer dead, no power, depending on your model.
Think of it as a fire-prevention fuse. When it blows, it protects your home by stopping the heat source.
Why GE uses a one-time, non-resettable thermal fuse
GE uses a one-time, non-resettable thermal fuse on purpose:
Safety first: If the dryer overheats badly enough to blow the fuse, something is wrong (vent, lint, thermostat, etc.). Forcing a reset could let the dryer overheat again and risk a fire.
Clear warning: A blown fuse is a strong sign that you need to fix the root cause, not just restart the dryer.
Stable performance: A single-use fuse is simple, reliable, and not affected by wear like mechanical reset switches.
Once the fuse blows, it must be replaced. There’s no safe permanent bypass.
Thermal fuse vs high-limit thermostat vs cycling thermostat
These three parts are easy to mix up because they all deal with heat. Here’s how they differ:
Part
Main Job
Resettable?
Typical Location
Thermal fuse
Emergency cut-off if dryer overheats
No – one-time
Blower housing or near heating element
High-limit thermostat
Stops heater if temp gets too high temporarily
Yes – auto reset
On heater housing / heating element
Cycling thermostat
Controls normal on/off cycling of heater
Yes – auto reset
On blower housing or exhaust duct
Thermal fuse: Last-resort safety. If it’s blown, something overheated badly.
High-limit thermostat: Backup safety that cuts power to the heater if temps go above normal range.
Cycling thermostat: Everyday “temperature manager” that turns the heater on and off to maintain the set temp.
When you’re troubleshooting GE dryer not heating, you often end up testing all three in the same area.
Common GE thermal fuse and thermostat part numbers
You’ll see a few part numbers come up over and over in GE electric dryers. Here are some of the most common:
Part Number
Type
Typical Use
WE4M137
Thermal fuse / cutoff
Common safety fuse on many GE electric dryers
WE04X26139
Thermal cutoff / safety fuse
Newer GE/Hotpoint models, often near heater
WE4M457
High-limit thermostat
Protects against over-temp on heater housing
WE4M216 / WE4M305
Cycling thermostats
Regulate normal drying temperature
When you order a replacement, you must match:
Part number (or a direct cross-reference)
Temperature rating (the “blow” temperature and thermostat range)
Style and connector type (
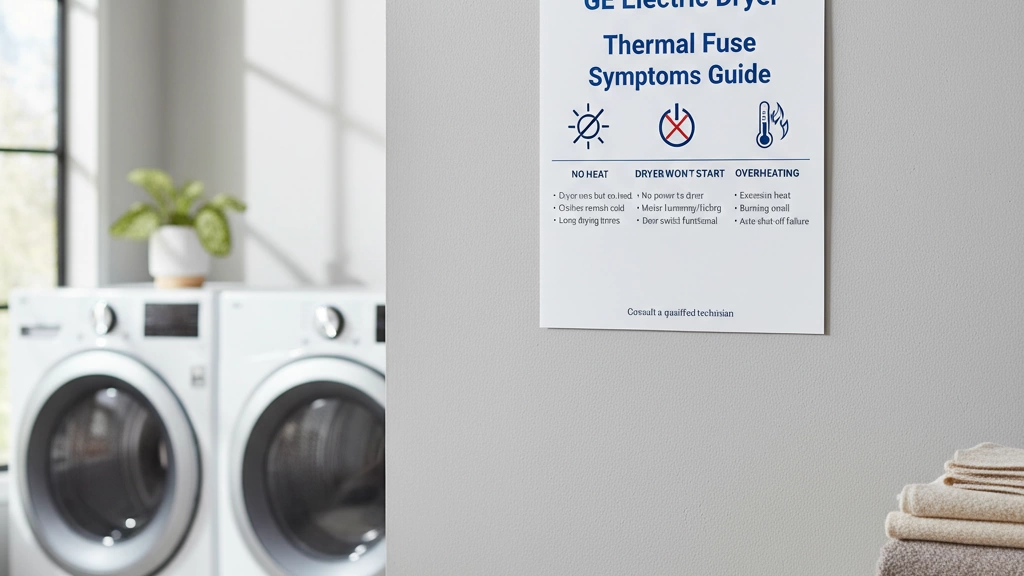
GE Electric Dryer Thermal Fuse Symptoms
When the GE electric dryer thermal fuse blows, it usually gives you a few clear warning signs. Knowing these symptoms helps you decide fast whether to test the fuse, the heating element, or the thermostats.
1. GE dryer runs but no heat (classic blown thermal fuse sign)
One of the most common complaints is: “My GE dryer runs but there’s no heat.”
Typical signs:
Drum tumbles, timer counts down, lights work.
Clothes come out cold or barely warm, even after a full cycle.
Multiple cycles still don’t dry the load.
In many GE models, the thermal fuse sits in the heater circuit. When it blows:
Power still reaches the motor.
Power is blocked from the heating element.
The dryer looks “normal,” but you get no heat at all.
Because this symptom is so common, I always suggest checking the thermal fuse first if your GE electric dryer runs but doesn’t heat.
2. GE electric dryer completely dead (no power at all)
On some GE dryers, a bad thermal fuse cuts power to almost everything, so it looks like the dryer just died.
You might see:
No lights on the control panel.
No beeps or display.
Pressing Start does nothing.
The drum won’t turn and there’s zero sound.
Before replacing anything:
Confirm the breaker is on.
Make sure the dryer is plugged in and the outlet has 240V.
If power is good, a blown thermal fuse is a top suspect for “GE dryer stopped working, no power.”
On models wired this way, the thermal fuse acts more like a main safety switch. Once it opens, the dryer is completely dead until you replace it.
3. Dryer starts then shuts off mid‑cycle
Another real-world symptom of a failing or blown GE electric dryer thermal fuse is a dryer that:
Starts normally.
Runs for a short time.
Shuts off suddenly and won’t restart until it cools or until you reset the breaker (depending on design).
In some cases:
A weak or heat-stressed safety device or thermostat can open intermittently.
It may feel like the dryer is “overheating and quitting.”
If this keeps happening, it’s a red flag:
The thermal fuse might already be blown or about to go.
There may be serious airflow or vent issues causing overheating, which will keep taking out fuses.
4. How symptoms differ from heating element or thermostat failures
It’s easy to confuse thermal fuse issues with a bad heating element or thermostat. Here’s the simple way to tell them apart:
Blown thermal fuse:
Dryer may run with no heat OR be totally dead (depends on model wiring).
Usually triggered by overheating from poor airflow (clogged vent, lint buildup).
Often a one-time, non-resettable safety part.
Bad heating element:
Dryer runs normally but never heats.
Everything else (lights, timer, drum) is fine.
You usually still have continuity through the fuse and thermostats, but the element tests open.
Bad thermostat (high-limit or cycling thermostat):
Heat may be inconsistent: too hot, shuts off early, or cycles oddly.
Dryer might overheat and then stop until it cools.
The thermal fuse may blow if the thermostat sticks closed and lets temps get too high.
When you see “GE electric dryer no heat,” don’t guess. A quick continuity test on the thermal fuse, element, and thermostats will tell you what failed. If you want a deeper walkthrough on symptoms and causes, I break this down step by step in our GE electric dryer thermal fuse guide at cnsovio: just search for our detailed GE electric dryer thermal fuse article on cnsovio.com for visuals and part references.
Tools and Parts for GE Electric Dryer Thermal Fuse Repair
When you’re dealing with a GE electric dryer thermal fuse issue, having the right tools and parts on hand lets you diagnose and fix the problem fast and safely.
Basic Tools You Need
You don’t need a full workshop. For most GE dryer thermal fuse repairs, this is enough:
1/4″ nut driver – for removing rear and front panels and access covers
Phillips screwdriver – for control panel screws and smaller brackets
Flat screwdriver or plastic pry tool – to gently release clips without scratching panels
Needle-nose pliers – to pull off tight wire connectors and hold small parts
Work light or headlamp – so you can clearly see the fuse and wiring inside the cabinet
Vacuum with hose attachment – to clean lint around the blower housing and heater area while you’re in there
Keep a small container or magnetic tray handy so you don’t lose screws.
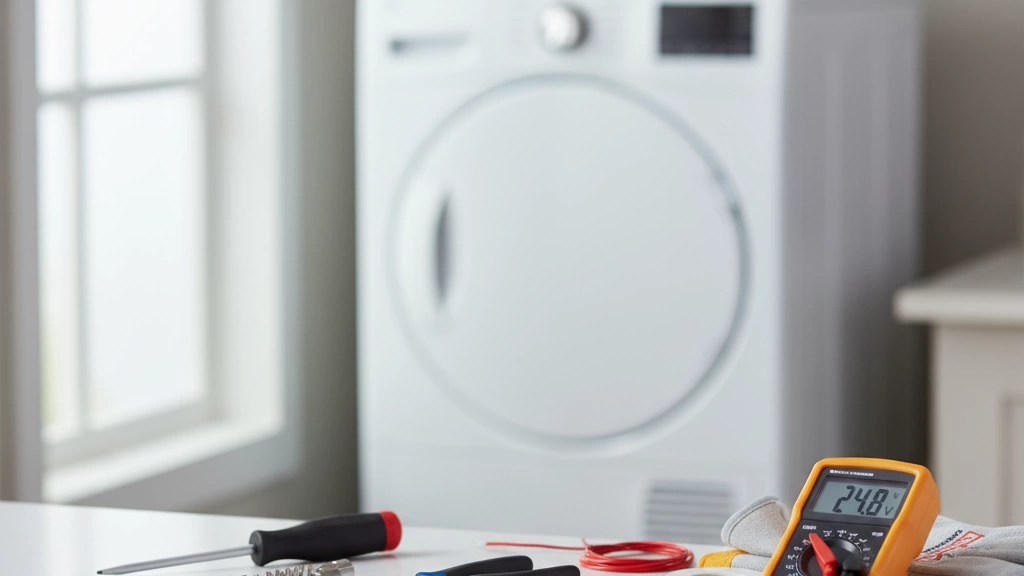
Using a Multimeter to Test a GE Dryer Thermal Fuse
A multimeter is the key tool to confirm if your GE dryer not heating problem is caused by a blown thermal fuse.
Set your multimeter to continuity or the lowest ohms (Ω) setting.
Disconnect power to the dryer (unplug and shut off the breaker).
Remove one wire from the fuse terminal so you’re not reading the rest of the circuit.
Place a meter probe on each terminal of the thermal fuse.
What the reading means:
0–1 Ω or a beep (continuity) = fuse is good
OL / infinite resistance / no beep = fuse is open/blown and must be replaced
This same method works for testing the high-limit thermostat and cycling thermostat as well.
Recommended GE Dryer Thermal Fuse Replacement Kits
For most GE electric dryer no heat or no power issues caused by the fuse, I recommend using a kit that includes the fuse plus key thermostats. That way you’re not reopening the dryer again soon.
Common options you’ll see:
WE4M137 thermal fuse – used on many GE models on the blower housing
WE04X26139 thermal fuse / cutoff – newer GE front-load and some GTD/GTX series
Kits that include:
Thermal fuse or thermal cutoff
High-limit thermostat (e.g., WE4M457 thermostat)
Mounting brackets and screws
Whenever possible, go for an OEM GE dryer thermal fuse so you get the correct temperature rating and trip point. Cheap aftermarket parts can trip too early or fail too soon, just like low-grade protective devices compared to properly engineered high-voltage vacuum circuit breakers in power systems.
Match the kit using:
Your full model number (e.g., GTD42EASJ0WW, DDC477…, DBLR…, GFD…)
The original part number printed on the old fuse/thermostat, when visible
Safety Steps Before Working on a GE Electric Dryer
Before you touch anything inside a GE electric dryer:
Unplug the dryer from the wall outlet
If it’s hard-wired, switch off the breaker at the electrical panel (both poles of the 240V circuit)
Verify no power by trying to start the dryer and confirming nothing lights up
Avoid working with wet hands or on a wet floor
Don’t bypass or jumper the thermal fuse except briefly for testing, and never run the dryer like that in regular use
Respect the fuse: it’s a safety device designed to prevent overheating and fire. Always fix the cause of the blown fuse (vent, airflow, wiring) when you replace it.
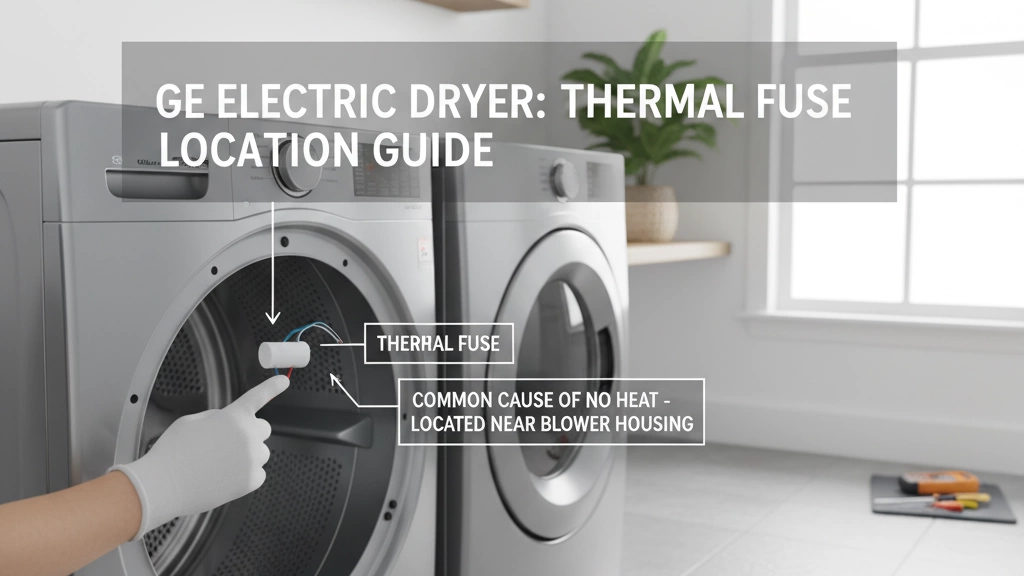
GE Electric Dryer Thermal Fuse Location by Model
When your GE electric dryer isn’t heating or is totally dead, knowing where the thermal fuse sits on your specific model saves a lot of time. I’ll walk through how to ID your model and the most common fuse locations on GE front‑load, top‑load, and older units.
How to Find Your GE Dryer Model Number
Before you look for the fuse, get the exact model number. GE has different layouts (GFD, GTD, GTX, DDC, DBLR, etc.), and fuse location can change slightly.
Check these spots for the model tag (white/silver sticker):
Door opening: On the frame just inside the door opening (most common).
Behind the door: On the door itself or around the door rim.
Back of the dryer: On the rear panel near a corner.
Inside the lint filter area: Remove the lint filter and look around the housing.
Write down the full model number (letters + numbers). That’s what you’ll use to match diagrams, parts, and correct fuse location.
GE Front-Load Electric Dryer Thermal Fuse Location
On most GE front-load electric dryers (especially GFD, GTD front-load style):
The thermal fuse is usually on or near the blower housing at the bottom front of the dryer.
Access is typically from the rear panel or the lower front panel, depending on the model.
Typical front-load layout:
Rear access style:
Unplug dryer and pull it out.
Remove the rear panel (1/4″ hex or Phillips screws).
Look near the blower housing (round/oval metal housing where the vent duct connects).
The thermal fuse is a small, flat, usually white or metal device with two wires, screwed to the housing.
Front/lower access style:
Unplug dryer.
Remove the lower front access panel (if your model has one).
Look on the blower housing or air duct right behind that panel.
The thermal fuse will again be a small two‑wire safety device mounted to metal ducting.
If you’re referencing appliance wiring protection or temperature safety concepts, resources like our electrical safety and power systems blog give a good big-picture view of why these one‑time fuses exist.
GE Top-Load & Older Style Electric Dryer Fuse Location
On older style GE electric dryers and some top-load style cabinet designs (like DDC, DBLR, older GTX):
Most of the time, the thermal fuse sits:
On the rear bulkhead close to the exhaust vent or
Directly on the blower housing behind the rear panel.
Typical top-load / older style access:
Unplug dryer and roll it away from the wall.
Remove the rear metal panel (many small screws).
Look for:
The blower housing (round metal housing feeding the vent).
The exhaust duct coming from the heater area.
The thermal fuse is usually:
A small rectangular or oval device, two terminals, screwed onto:
The blower housing, or
The vent / exhaust duct near the heating element canister.
Some older GE models also have a second safety device (like a high-limit thermostat) on the heater housing in a similar area, but the thermal fuse will be clearly in the airflow path as the last line of defense.
Common Fuse Locations: Rear Panel, Blower Housing, Near Heating Element
To keep it simple, for most GE electric dryers you’ll find the thermal fuse in one of three spots:
On the blower housing
This is by far the most common.
Look for a small device with two wires bolted to the round metal housing where the vent attaches.
On the exhaust duct / vent tube
Mounted on the metal duct that routes hot air out the back of the dryer.
Often near the lower center of the rear panel area.
Near the heating element housing
On or near the metal can that holds the heating element.
You might see both the high-limit thermostat and thermal fuse in this area.
If you’ve ever dealt with other thermal protection devices like a high‑voltage isolator switch in power systems, the concept is similar: it’s positioned where it can “sense” dangerous conditions first.
Model-Specific Notes: GFD, GTD, GTX, DDC, DBLR
Here’s a quick cheat sheet by series (always verify against your exact model):
GFD Series (modern front-load)
Thermal fuse typically on the blower housing, accessed from the rear panel.
You’ll also see thermostats on the heater housing nearby.
GTD Series (popular vented dryers)
For most GTD electric models, the fuse is on the blower housing or exhaust duct.
Access from rear panel on many units.
Some variants have a small lower front panel for easier airflow component access.
GTX Series
Similar to GTD: rear panel off, then look low on the blower housing or vent tube.
Be sure to distinguish between the thermal fuse and high‑limit thermostat (they’re often close together).
DDC Series (older style, like DDC477)
Usually on the blower housing behind the rear panel.
You may see it just above or beside the vent outlet.
Panel removal is straightforward; lots of small screws, then the entire back cover lifts off.
DBLR Series
Rear access as well.
Thermal fuse mounted on the blower housing or rear bulkhead near the heater.
Often near the bottom center of the dryer when the rear panel is removed.
If you match your model number first, then check these typical locations, you’ll spot the GE electric dryer thermal fuse quickly and avoid tearing apart sections you don’t need to touch.
How to Test a GE Electric Dryer Thermal Fuse
If your GE electric dryer has no heat or no power, the thermal fuse is one of the first parts I’d test. Here’s exactly how I do it.
Remove the GE dryer thermal fuse safely
Before touching anything:
Unplug the dryer from the wall.
If it’s hard‑wired, switch off the breaker at the panel.
Slide the dryer out so you can reach the back and vent.
Typical access steps (may vary by model):
Disconnect the vent hose at the back.
Use a 1/4″ nut driver or Phillips screwdriver to remove the rear panel or lower front panel.
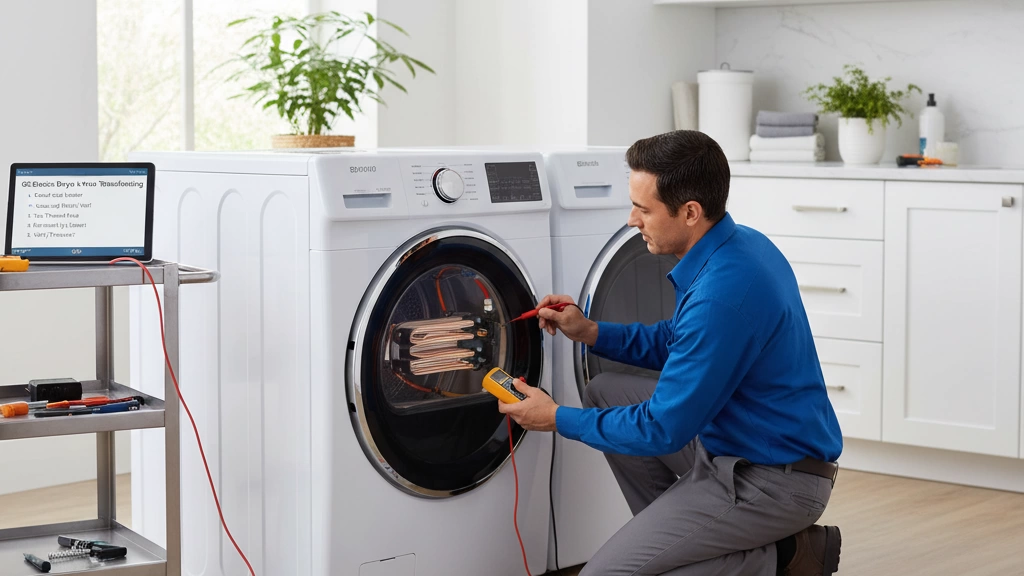
Find the thermal fuse:
Usually a small, flat, white or metal device with two wires.
Often mounted on the blower housing or near the heating element.
Take a photo of the wiring so you remember where everything goes.
Pull off the two wires from the fuse terminals.
Remove the screws holding the fuse and take it out.
Work like you’re around live power gear: even though this is a home appliance, I treat safety like I would near a low-voltage distribution box.
How to test a GE dryer thermal fuse with a multimeter
You’re doing a simple continuity test:
Set your multimeter to continuity (beep symbol) or the lowest ohms (Ω) range.
Touch the two meter probes together:
You should hear a beep or see a very low reading (0–1 Ω). That confirms the meter works.
Touch one probe to each terminal on the thermal fuse.
What multimeter readings mean (0 ohms vs open)
Good thermal fuse:
Multimeter beeps in continuity mode, or
Shows 0–1 Ω (very low resistance).
Blown thermal fuse:
No beep, and
Meter shows OL / Open / Infinity or a very high number.
If the fuse reads open/infinite, it’s bad and must be replaced. Never reinstall a blown fuse.
How to temporarily bypass a GE dryer thermal fuse (testing only)
If you want to confirm the fuse is the cause, you can do a very short‑term test bypass:
Make sure power is still off.
With the fuse removed, connect the two wires together using:
An insulated jumper wire, or
A small wire nut to twist them together.
Make sure the joined wires are not touching metal and are safely tucked away.
Reassemble just enough to run the dryer.
Restore power and run the dryer for a brief test (no clothes needed):
If the dryer now powers on or heats, the fuse was the problem.
This bypass is only for testing a GE electric dryer no heat/no power issue.
Warnings and safety risks of running with a bypassed fuse
I’ll be blunt: do not run your GE dryer with the thermal fuse bypassed beyond a quick test.
The thermal fuse is a safety cut‑off to prevent dangerous overheating.
Running without it can lead to:
Extreme internal temperatures
Burned wiring
Fire risk, especially if your vent is restricted or lint‑packed.
A bypass also hides the real cause (blocked vent, bad thermostat, grounded heater, etc.), which can damage more parts.
Once you confirm the fuse is bad:
Remove the bypass immediately
Fix the root cause (vent, airflow, thermostats, heating element)
Install a correct‑rating OEM or quality replacement thermal fuse matched to your GE model.
Test smart, but always put safety and proper repair first.
GE Electric Dryer Thermal Fuse Replacement Steps
Replacing a GE electric dryer thermal fuse is straightforward if you stay organized and work safely. Below is a simple, step‑by‑step guide that works for most GE front‑load and top‑load electric models (GTD, GTX, GFD, DDC, DBLR, etc.).
1. Prep and Safety First
Before touching anything:
Unplug the dryer or switch off the correct breaker.
If it’s been running, let the dryer cool down completely.
Pull the dryer out so you have room behind and on the sides.
Keep screws in a small container so you don’t lose them.
For anyone curious about how protective devices work in general, industrial gear like a medium-voltage circuit breaker uses the same basic idea: cut power fast when there’s a fault.
2. Step‑by‑Step Disassembly (Popular GE Models)
Where you start depends on your style of GE dryer:
Rear‑access models (most GTD/GTX, many older GE dryers):
Remove the rear panel screws with a 1/4″ nut driver or Phillips screwdriver.
Lift off the rear panel and set it aside.
You’ll usually see the blower housing and heating element area. The thermal fuse is often a small, white or metal rectangular part with two wires, mounted with 1–2 screws.
Front‑access / some front‑load GE dryers:
Remove the top panel: take out the screws at the back edge, slide the top back, and lift it off.
Remove control panel screws (if needed) and tilt the panel forward or off.
Remove front panel screws (top and sometimes bottom), disconnect the door switch harness, and lift the front panel off.
The thermal fuse is typically on the blower housing at the bottom or near the heater assembly.
3. Removing Panels to Reach the Thermal Fuse
Once you can see the internal components:
Follow the metal ductwork from the lint filter area to find the blower housing.
Look for a small, flat sensor with two wires—that’s usually your GE dryer thermal fuse (often paired with a high‑limit thermostat nearby).
Take a quick photo of the wiring so you can put it back exactly the same way.
4. Disconnecting Wires and Swapping the Blown Fuse
Label or photograph the wires going to the fuse.
Gently pull off the push‑on terminals with needle‑nose pliers (pull on the connector, not the wire).
Remove the mounting screw(s) that hold the thermal fuse to the housing.
Install the new GE electric dryer thermal fuse in the same position.
Reinstall the mounting screws snugly—don’t overtighten and crack the part.
Push the wire terminals back onto the new fuse firmly until fully seated.
Make sure the replacement fuse matches your model and rating. Wrong ratings can cause nuisance trips or, worse, safety issues—similar to using the wrong rating on a medium-voltage breaker in industrial setups.
5. Reinstalling the New Thermal Fuse Correctly
The fuse should sit flat on the metal surface (blower housing or heater duct).
The metal surface must be clean so it can sense temperature properly.
Wires must follow the same routing as before—no stretching or twisting.
If your kit came with a thermal fuse and thermostat, replace both at the same time so the temperature protection system is balanced and consistent.
Not laying directly on the heating element housing
When you align the rear or front panel:
Make sure the edges sit flush—no gaps or forcing.
Confirm the drum turns freely by hand before screwing everything tight.
Reconnect the door switch harness on front‑access models.
Reinstall the lint screen and confirm all screws are back in place.
7. Common Mistakes During GE Dryer Thermal Fuse Replacement
Avoid these issues—I see them all the time:
Bypassing the fuse permanently: That’s a fire risk. Only bypass briefly for testing, if at all, and then restore proper protection.
Wrong part number or rating: Always match the OEM spec (e.g., WE4M137, WE04X26139, etc.) for your exact model.
Loose wire connections: Loose terminals build heat and can damage parts again.
Fuse not seated against the metal: It can’t sense real temperature and may blow early.
Ignoring the root cause: If the old thermal fuse blew, check and clean the vent, lint filter housing, and blower wheel. If you skip this, the new fuse can blow again fast.
Once everything is back together, plug the dryer in, run a short cycle on High Heat, and watch for:
Normal drum rotation
Heat coming from the exhaust after a minute or two
No unusual noises or burning smells
If the new GE electric dryer thermal fuse blows again quickly, you’re likely dealing with a blocked vent, bad thermostat, or heating element issue, and it’s worth digging deeper or calling in a pro.
Why the GE Electric Dryer Thermal Fuse Keeps Blowing
If your GE electric dryer thermal fuse keeps blowing, the fuse isn’t the real problem – it’s a symptom of overheating. Fix the root cause, or you’ll keep replacing fuses.
1. Restricted vent or clogged lint
A blocked dryer vent is the number one reason a GE dryer not heating and blowing fuses.
Common issues:
Crushed, kinked, or extra‑long vent hose
Vent packed with lint, dust, or bird nests
Vent cap outside stuck or not opening fully
When hot air can’t escape, heat builds up around the thermal fuse, and it opens (blows) to protect the dryer from a fire risk. If you’re troubleshooting overheating issues in other electrical systems too, the same principle applies when protecting components with safety and isolation devices like those discussed in this low-voltage switchgear component guide.
2. Dirty lint filter and internal lint buildup
Even with a good vent, a clogged lint filter or internal lint buildup will choke airflow:
Lint screen not cleaned every load
Fabric softener residue coating the filter
Lint packed around the blower housing and heating element
This forces the dryer to run hotter, and the thermal cutoff or fuse trips to stop a potential overheat.
3. Bad blower wheel or weak airflow
On many GE front load and top load dryers, a worn or damaged blower wheel can cause weak airflow:
Blower wheel cracked or loose on the motor shaft
Wheel jammed with lint, socks, or debris
Motor not spinning at full speed
Low airflow = high temperature around the GE dryer thermal fuse, so it keeps blowing even if the vent looks OK.
4. Faulty thermostats or grounded heating element
If the high‑limit thermostat (WE4M137, WE4M457) or cycling thermostat fails, it may let the dryer run too hot:
Thermostat stuck closed (never opens to cut power to the heater)
Thermostat out of calibration and cutting out way too late
A grounded heating element can also overheat the drum constantly by staying energized when it shouldn’t. In both cases, the thermal fuse is the last line of defense and will blow repeatedly until the bad part is replaced.
5. Electrical or wiring issues
Less common, but very real:
Loose connections at the heater, thermostats, or fuse
Burned or shorted wires touching metal
Incorrect line voltage or intermittent power surges
These can cause spikes in heat or current that over‑stress the GE electric dryer thermal fuse.
If your GE electric dryer thermal fuse keeps blowing, don’t just swap the fuse. Check airflow, venting, lint buildup, blower performance, and thermostats first. That’s how you fix the problem once, not every few weeks.
Preventing Future Thermal Fuse Failure in GE Dryers
If your GE electric dryer thermal fuse keeps blowing, you don’t just have a fuse problem—you have a heat and airflow problem. Here’s how I’d prevent it from happening again.
Simple Dryer Vent Cleaning Checklist
Use this quick checklist every 3–6 months (more often if you dry heavy loads or live in a humid area):
Unplug the dryer and shut off power at the breaker.
Clean the lint filter before or after every load.
Vacuum the lint filter housing (the slot where the screen slides in).
Pull the dryer out and:
Disconnect the vent hose.
Vacuum lint from the vent outlet on the dryer.
Check the vent hose for kinks, tears, or heavy lint.
Go outside and:
Inspect and clean the exterior vent hood.
Make sure the flap opens freely when you blow air through.
For long or complex vent runs, consider a vent cleaning brush kit or a professional cleaning service, especially in commercial or multi-unit buildings where airflow control is as critical as in professional switchgear systems.
How Often to Clean GE Dryer Vent and Lint Filter
Lint filter: Every load. No exceptions.
Vent hose and wall connection: At least every 6 months.
Full vent run (wall to exterior): Every 12 months, or every 3–6 months if:
You do laundry daily.
You dry heavy fabrics (towels, bedding, hoodies).
You have a long or narrow vent run.
If the thermal fuse has already blown once, I recommend a
OEM vs Aftermarket GE Electric Dryer Thermal Fuses
When you’re dealing with a GE electric dryer thermal fuse, the part you choose matters. I’ll keep it simple: you want the right rating, right fit, and consistent protection so your dryer doesn’t become a fire risk.
Pros and Cons of OEM GE Thermal Fuses
OEM = Genuine GE parts (like WE4M137, WE04X26139, paired with stats like WE4M457).
Pros:
Perfect fit & spec – Designed for GE models (GTD, GTX, GFD, DDC, DBLR, etc.).
Correct temperature rating – Trips at the exact temp GE engineered.
Reliable quality control – Less chance of early failure or nuisance trips.
Better compatibility – Plays nice with GE thermostats and control boards.
Cons:
Higher price – Often 2–4× more than cheap aftermarket.
Limited options – Usually just basic fuse, not upgraded kits.
Common Issues With Cheap Aftermarket Thermal Fuses
With very cheap aftermarket parts, the biggest risk is inconsistent performance.
Typical problems I see:
Wrong or unclear temperature rating
Fuse blows too soon → constant “GE dryer not heating.”
Blows too late → safety risk, overheating, scorched wiring.
Bad crimp lugs / weak terminals
Loose connections cause arcing and heat at the terminals.
Thin or poor-quality bodies
Plastic housings deform near the heating element or blower housing.
Short life
New fuse blows in days because it can’t handle normal GE operating temps.
If the price looks too good to be true, it usually is.
Benefits of Upgraded or Premium GE Dryer Thermal Fuse Kits
I like to use premium kits (OEM or high‑quality aftermarket) that bundle thermal fuse + high-limit thermostat (for example: fuse + WE4M457 style thermostat). They solve more problems in one go.
Why upgraded kits are worth it:
Matched components
Fuse and thermostat are calibrated to work together, reducing repeat failures.
If the listing doesn’t clearly show temp rating and GE compatibility, skip it.
Quick comparison:
Type
Best For
OEM GE fuse
Warranty-like repair, exact match
Premium aftermarket kit
Value + durability, full safety refresh
Ultra-cheap aftermarket
Only if you’re okay with high risk
Why Better-Quality Fuses Handle Real-World Lint and Heat Better
Real homes aren’t lab conditions. Vents get partially clogged, lint builds up, airflow drops. A quality GE electric dryer thermal fuse is built to handle that reality without being unsafe.
What better-quality fuses offer:
Stable trip point
They don’t drift or weaken after a few hot cycles.
Better heat tolerance at the body
Housing doesn’t deform when near the heater or blower on long, hot cycles.
Consistent performance under heavy use
Ideal if you do frequent loads, big family laundry, or run rentals/Airbnbs.
I always treat the thermal fuse as a safety device, not a place to save $5. Go OEM or solid premium aftermarket, match the correct part number and rating, and you’ll get safer operation and fewer “GE dryer not heating” callbacks.
When GE Electric Dryer Thermal Fuse Isn’t the Problem
Sometimes the GE electric dryer thermal fuse gets blamed for every issue, but it’s not always the culprit. If your GE dryer not heating or GE electric dryer has no power, here’s what else I’d look at.
Other common causes of GE dryer no heat
If the thermal fuse tests good (shows continuity), focus on these:
Heating element (heater assembly)
Coil burned open = dryer runs but no heat
Often shows visible breaks or burned spots
High-limit thermostat (e.g. WE4M137, WE4M457)
Stuck open = no power to the heater
Cycling thermostat
Stuck too low = weak heat or very long dry times
Incorrect power supply
Electric dryers need 240V (two hot legs)
If one leg of power is lost, the drum runs but no heat
Broken or loose wiring
Burned connectors on the heater, thermostats, or timer/control board
If the dryer runs normally, tumbles, but never warms up, I’d test the heating element and thermostats before blaming the fuse.
GE dryer no power issues not related to the thermal fuse
When your GE dryer stopped working, no power, but the thermal fuse checks good:
Tripped breaker or half-tripped double breaker
Turn the dryer breaker all the way off, then back on
Bad door switch
If the switch doesn’t “click” or has no continuity, the dryer won’t start
Broken belt switch (on belt-safety models)
Snapped belt can keep the motor from running
Blown line fuse in the house panel
Less common, but worth checking if outlets nearby are also dead
Faulty start switch
Drum never even tries to turn
These problems will make the dryer seem “dead” even with a good GE electric dryer thermal fuse.
When a control board, timer, or wiring fault is more likely
On some GE models (GTD, GTX, GFD series), a bad control board or timer can mimic a fuse problem:
Control board issues
Dryer has lights but won’t start
Random shutting off mid-cycle
No heat even though elements and thermostats test good
Bad timer (older mechanical models)
Stuck in one position
No voltage sent to the heater or motor circuits
Wiring faults
Melted connectors on:
Heater terminals
Thermal cutoffs
Control board plugs
If you see burn marks, melted plastic, or loose connections, you’re likely dealing with wiring or control, not the thermal fuse.
When to test thermostats, heating element, and door switch instead
Before buying another GE dryer thermal fuse, I’d test these with a multimeter:
Heating element
Should show continuity (usually 8–20 ohms)
High-limit thermostat & cycling thermostat
Should show continuity at room temperature
Door switch
Should switch between open and closed as you press/release the door button
Belt switch (if equipped)
Must show continuity when the belt is tight
If any of these read open (infinite resistance) when they shouldn’t, that part is likely your real problem.
When calling a professional makes more sense
You can absolutely DIY a GE dryer thermal fuse replacement with basic tools. But I’d call a pro if:
You smell burning plastic or see clear signs of electrical damage
The control board looks burned, bulged, or has blown components
You’re not comfortable working around 240V circuits
The fuse keeps blowing even after:
Vent cleaning
Element and thermostat checks
Your dryer is stacked, built-in, or hard to move safely
In those cases, a qualified tech can test live voltage, check the control board, and trace wiring faults faster and safer than guessing and swapping parts.
GE Electric Dryer Thermal Fuse FAQ
Can I bypass the GE dryer thermal fuse permanently?
Short answer: no, don’t do it.
The GE electric dryer thermal fuse is a critical safety part.
If you bypass it permanently, the dryer can overheat and become a serious fire risk.
A quick bypass is fine ONLY for a short test (a few minutes) to confirm a bad fuse, with the dryer watched the whole time.
If your GE dryer not heating issue goes away when it’s bypassed, replace the thermal fuse right away and fix the root cause (usually vent or airflow problems).
Will a blown GE thermal fuse trip the breaker?
Usually no.
A blown GE dryer thermal fuse opens the heating or power circuit.
That stops power going through that path, but it does NOT normally trip the house breaker.
If your breaker is tripping, think:
Shorted / grounded heating element
Damaged wiring
Bad outlet or loose connections
So: GE electric dryer no power plus a tripped breaker is usually not caused by the thermal fuse itself.
Where is the second thermal fuse or safety thermostat on some GE models?
Many newer GE front-load and some top-load style dryers use more than one safety device:
One thermal fuse or thermal cutoff is often on the blower housing or near the exhaust duct.
A high-limit thermostat (like WE4M137 or WE4M457) is usually mounted on or near the heating element housing.
Some GFD, GTD, GTX, and similar series may have:
A primary thermal cutoff
A secondary high-limit thermostat or safety thermostat
Always check your exact GE dryer thermal fuse location by model number. Don’t assume they’re all in the same place.
Is the thermal fuse the same on GE gas dryers vs electric dryers?
No, they’re not always the same.
Both gas and electric GE dryers use thermal fuses and safety thermostats.
Part numbers, temperature ratings, and mounting styles are often different.
GE electric dryer thermal cutoff parts (like WE04X26139, WE4M137) are not automatically interchangeable with gas models.
Always match by:
Model number
Exact GE part number
Correct temperature rating and style
How long does a new GE dryer thermal fuse usually last?
If everything is working right:
A quality OEM GE dryer thermal fuse should last years, often the life of the dryer.
If it blows in weeks or months, that’s not “normal wear” – that’s a symptom.
Fast-blowing fuses usually mean:
Restricted dryer vent
Lint buildup inside the dryer
Weak blower or airflow issues
Failing high-limit thermostat or heating element running too hot
What to do if the new fuse blows again right away?
If your GE dryer thermal fuse keeps blowing, treat it as a warning, not a bad part:
Stop replacing fuses and look for the cause:
Clean the entire vent from the dryer to the outside cap.
Make sure the outside vent flap opens freely.
Clean lint from the blower housing and internal ductwork.
Test key components:
High-limit thermostat and cycling thermostat (e.g., WE4M457)
Heating element for shorts to ground
Blower wheel for cracks, wobble, or blockages
Use quality parts:
Stick to OEM GE electric dryer thermal fuses or trusted premium kits, not the cheapest aftermarket option.
If the new fuse blows instantly again and you’re not finding the problem, it’s time to call a pro. At that point, you may be dealing with a deeper wiring or control issue, not just a simple fuse failure.
When it comes to electrical safety, there is no room for compromise. A switch disconnector does more than just break a circuit—it provides the visible, reliable isolation necessary to protect both your equipment and your personnel during critical maintenance. But with evolving IEC 60947-3 standards and the specialized demands of solar PV and industrial AC/DC systems, selecting the right component has never been more complex. […]
What Does the Thermal Fuse Do and Why It Blows The thermal fuse in a GE electric dryer is a crucial safety device designed to prevent fires. Think of it as the dryer’s smoke detector—it shuts off the heat if things get too hot inside. When the dryer’s temperature rises beyond safe limits, the thermal […]
We use cookies to enhance your browsing experience, serve personalised ads or content, and analyse our traffic. By clicking "Accept All", you consent to our use of cookies.