If your GE dryer is tumbling but blowing ice-cold air—or suddenly won’t start at all—there’s a very good chance the thermal fuse just sacrificed itself to protect your home.
The good news? On most General Electric dryers, a bad thermal fuse is one of the easiest and cheapest fixes you can do yourself… if you know the right part number, the exact location, and how to test it with a multimeter.
In this guide, you’ll quickly learn:
The real symptoms of a blown GE dryer thermal fuse (and how to confirm it’s the problem)
The most common GE thermal fuse part numbers like WE4M137 and WE04X26139
Where the thermal fuse is located on your specific GE model
How to test and replace it safely—in about 20 minutes, even if you’re not “handy”
You’ve got a pile of wet laundry and no time for guesswork. Let’s find your GE dryer thermal fuse, fix the no-heat problem, and stop it from blowing again.
Symptoms of a Blown GE Dryer Thermal Fuse
When the GE dryer thermal fuse blows, your day can fall apart fast—wet clothes, weird dryer behavior, and no clear reason why. The good news: the fuse gives off some clear warning signs. If you know what to look for, you can zero in on the problem quickly.
Dryer Runs but No Heat
One of the most common symptoms is simple:
The drum tumbles.
The light inside works.
The timer counts down.
But your GE dryer is not heating at all.
What this usually feels like to you:
Clothes come out cold and damp.
You can run three full cycles and nothing gets dry.
The dryer sounds “normal,” but there’s no warm air when you open the door.
This “dryer runs but no heat” issue is a classic sign of:
A blown GE dryer thermal fuse
A bad high-limit thermostat
Or a failed heating element
But the thermal fuse is one of the first things you should suspect.
Dryer Won’t Start at All
On many GE, GE Profile, Adora, Hotpoint, GFD, and GTD models, a blown thermal fuse can completely kill the dryer.
You might see:
No drum movement when you press Start
No click or relay sound
Sometimes the light inside comes on, but nothing else happens
The control panel may power up, but the dryer will not run
If your outlet has power and the breaker isn’t tripped, a dead thermal fuse is high on the list.
Timer Advances but No Heat
Another common GE dryer no-heat symptom:
The timer dial moves normally.
The cycle finishes when it should.
The dryer may even feel slightly warm from the motor running.
But your clothes stay wet or just barely warm.
If the timer or control board is advancing and the motor is running, your dryer is trying to work. When you get “timer runs but no heat,” it often points to:
Blown GE dryer thermal fuse
Open high-limit thermostat
Faulty heating element or broken heating coil
The thermal fuse is the safety device that opens when the dryer overheats. Once it blows, it stays open until replaced.
Dryer Takes Forever to Dry Clothes
Sometimes the thermal fuse hasn’t completely failed yet—or you’re seeing the early signs of overheating that will blow it soon.
Watch for:
Loads that used to dry in 40–50 minutes now take 70–90 minutes
You have to restart the dryer one or two extra times
Clothes are warm but still damp in thicker areas like seams and waistbands
The top of the dryer or the front panel feels unusually hot
This often means:
Airflow is restricted (clogged vent, crushed hose, lint buildup)
The dryer is running hot and stressing the thermal fuse
The fuse may have already weakened and is close to failing
If you ignore this, the thermal fuse will likely blow, and then you’ll have a dead-heat or no-start situation.
Other GE Dryer No-Heat Symptoms to Watch For
A few more red flags that often show up when the GE dryer thermal fuse is blown—or about to be:
Burning or “hot dust” smell during or after a cycle
Outside dryer vent flap barely opens or doesn’t move at all
The dryer stops mid-cycle and won’t restart until it cools down
The dryer overheats on shorter loads, especially heavy towels or bedding
You hear the dryer running normally, but inside the drum there’s:
No warm air
No consistent heat cycling on and off
If you’re dealing with:
GE dryer not heating
GE dryer won’t start
Dryer runs but no heat
Dryer takes too long to dry
then the GE dryer thermal fuse is one of the first components you should suspect—and test. Identifying these symptoms early can save your fuse, your heating element, and in extreme cases, prevent a dangerous overheating situation.
GE Dryer Thermal Fuse Part Numbers by Model and Year
When a GE electric dryer stops heating or won’t start, getting the right thermal fuse part number is critical. Using the wrong fuse can cause repeat failures or even safety issues.
Most common GE dryer thermal fuse part numbers
On modern GE, GE Profile, Adora, Hotpoint, GFD and GTD dryers, you’ll see a few thermal fuse part numbers over and over:
WE4M137 – one of the most widely used GE dryer thermal fuses / safety thermostats on older and mid-range models.
WE04X26139 – common on many newer GE front‑load and GTD series dryers (roughly 2018–2025).
WE49X28295 – kit that typically includes a high‑limit thermostat, thermal fuse and related hardware for popular GE models.
These are not interchangeable on every model. Always match what your model calls for. For a deeper breakdown of how GE uses these fuses across different models and years, you can reference this focused guide to the GE electric dryer thermal fuse: https://cnsovio.com/ge-electric-dryer-thermal-fuse/
How to find the right thermal fuse for your GE dryer
Do this before you buy anything:
Get your full model number:
Look for tags like “GTD42EASJ0WW”, “GFD85ESPN0RS”, etc.
Write the complete code, including all letters at the end.
Use a parts lookup:
Search “[your full model number] thermal fuse”
Or use a reputable parts site and enter the model number in their search bar.
Confirm the part description says “thermal fuse”, “safety thermostat” or “safety thermostat / fuse” for your exact model.
Cross-check by image:
Compare the picture of the new fuse to the one in your dryer:
Same number of terminals
Same bracket shape / mounting style
Similar temperature ratings printed on the body
If you’re running a repair business or shop, I strongly suggest you keep WE4M137, WE04X26139 and the WE49X28295 kit in stock, as these cover a big chunk of the GE dryer market worldwide.
GE Profile, Adora, Hotpoint, GFD, GTD series cross-reference
In general (always verify by model number):
GE Profile / Adora:
Older models: often use WE4M137 or similar safety thermostats.
Newer Profile front-load/GFD-style: more likely WE04X26139 or a kit like WE49X28295.
Hotpoint:
Many Hotpoint dryers share GE platforms, so WE4M137 and WE49X28295 show up a lot.
Lower‑end Hotpoint units sometimes use simpler, single thermal fuse styles.
GFD series (high-end front load):
Frequently use updated fuses/thermostat kits; WE04X26139 is common, but not guaranteed.
Always cross-reference by full model because trim and year matter here.
GTD series (popular vented dryers):
Mid-2010s models often use WE4M137 type safety thermostats.
Late‑model GTD dryers (around 2020–2025) increasingly use WE04X26139 or WE49X28295 kits.
Think of the part numbers above as “likely candidates,” not a shortcut. The exact cross-reference still depends on the full model and sometimes the production year.
2025 updated GE dryer thermal fuse compatibility
By 2025, GE has consolidated a lot of their electric dryer platforms, which means:
Fewer unique fuse designs, more use of:
WE04X26139 on high‑efficiency and newer standard dryers.
WE49X28295 kit on many service bulletins as the “go‑to” repair set.
Some older part numbers are superseded:
The original fuse or thermostat you see in the machine may be replaced by one of these newer part numbers in the official parts list.
Always check:
“Replaces” or “Supersedes” notes on the parts site.
That the 2025‑era replacement part is approved for your exact model.
How to read GE dryer model tags correctly
Finding and reading the model tag properly is where most people go wrong. Here’s what to look for:
Where the tag usually is:
Top-load / traditional dryers:
Open the door; look around the door frame (top, sides, or bottom).
Sometimes on the back panel near the power cord.
Front-load / GFD:
Inside the door opening on the frame.
On the side of the cabinet once you pull the dryer slightly out from the wall.
Stackable or laundry-center:
On the inside of the dryer door.
Or behind the lower front panel.
How to read the tag:
Model: Example “GTD42EASJ0WW”
Every letter and number matters.
“GTD42EASJWW” is not the same as “GTD42EASJ0WW” – that “0” can change the parts.
Serial / production year:
Helps confirm compatibility when parts diagrams show “fits models made after/before [date]”.
Use the full tag:
When searching online, always type the full model exactly as printed.
Avoid guessing missing letters or numbers; if the tag is dirty, clean it gently and re-check.
Once you have the correct model code, matching the right GE dryer thermal fuse (WE4M137, WE04X26139, WE49X28295, or another variant) becomes straightforward and prevents wasted time, returns, and repeat failures.
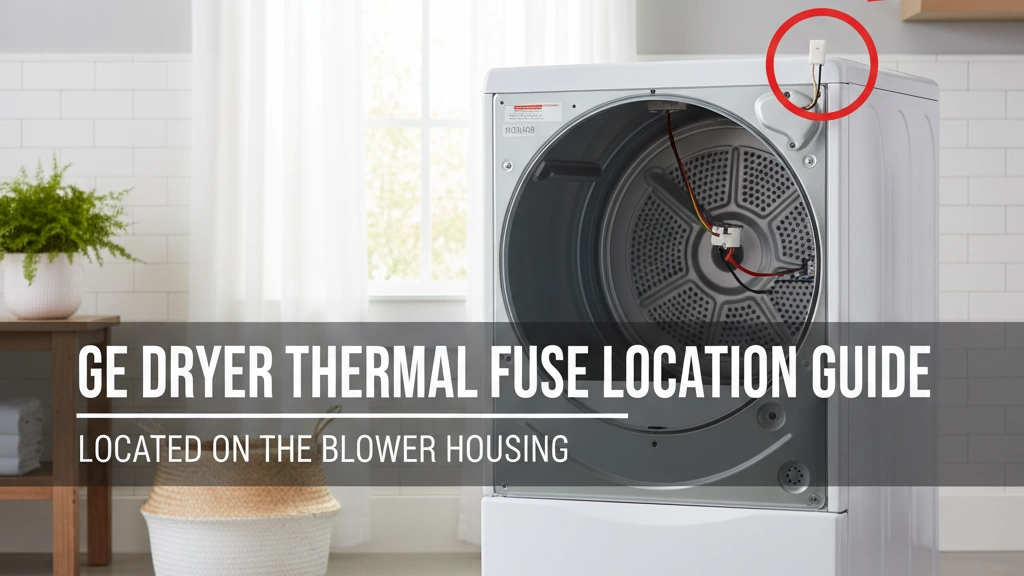
GE Dryer Thermal Fuse Location On Different Models
Knowing where the GE dryer thermal fuse sits is half the battle. It’s always on the “exhaust/airflow” side of the dryer, but the exact spot changes by design and year.
Thermal Fuse Location On Front‑Load GE Dryers
Most front‑load GE and GE Profile electric dryers place the thermal fuse near the blower housing or exhaust duct:
Typical locations:
On the blower housing, bottom front, slightly to the left or right
On the metal exhaust duct running toward the back
How to reach it (common style):
Unplug the dryer.
Pull the dryer out and remove the rear panel OR lower front kick panel (depends on model).
Look for a small, flat, button‑style part with 2 wires on the exhaust housing.
Quick reference (front‑load):
Area
Likely Fuse Location
Bottom front
Blower housing/exhaust outlet
Rear center
Main exhaust duct
Thermal Fuse Location On Top‑Load / Traditional GE Dryers
On older “traditional” style GE dryers (top control, door on front, deep drum), the thermal fuse is almost always on the rear exhaust duct:
Typical locations:
On the long silver exhaust tube at the back (center or slightly off‑center)
Near the high‑limit thermostat on the same duct
How to reach it:
Unplug dryer and slide it away from the wall.
Remove the large rear panel.
Find the exhaust duct; the thermal fuse is the small, round or oval device with 2 wires, screwed to the duct.
Quick reference (top‑load style):
Access Panel
Look For Fuse On
Rear panel
Exhaust duct / housing
Thermal Fuse Location On Newer GE GFD & GTD Series (2022–2025)
Newer GE GFD (front‑load) and GTD (top‑load style) dryers are more compact inside, but the logic is the same: fuse = exhaust path.
GE GFD series (front‑load):
Usually on the blower housing behind the lower front panel
Sometimes accessible from the rear panel, right above the exhaust outlet
GE GTD series (top‑load style):
Typically on the rear exhaust duct, near the heater housing
A few models move it slightly to the side of the duct for easier wiring
Because these newer machines pack more electronics, be extra gentle with harnesses and boards when you open them. For any work around high‑energy switching gear, we follow the same safety mindset we use on medium‑voltage gear and vacuum circuit breaker systems—power off, verify, then touch.
How To Safely Access The Thermal Fuse (Without Breaking Panels)
Stay methodical and you won’t crack any plastic or bend metal:
Before you start:
Unplug the dryer (and shut off the breaker if needed).
Move it out gently; don’t crush the vent hose.
Panel removal tips:
Use the right size nut driver or screwdriver (usually 1/4″ or Phillips).
Keep screws in a small tray so you don’t lose them.
If there are clips:
Pry close to the clip with a flat screwdriver or plastic pry tool.
Don’t twist hard; apply steady, even pressure.
If a panel won’t move, stop. You probably missed a screw.
Wire handling:
Hold connectors by the plastic, not by the wire.
Take a quick photo of wiring before disconnecting anything.
Common Mistakes When Looking For The GE Dryer Thermal Fuse
People often waste time or cause damage because they’re hunting in the wrong spot. Avoid these:
Mistaking the wrong part:
High‑limit thermostat or cycling thermostat isn’t the same as the thermal fuse (they look similar).
The fuse usually has no reset button; if it has a button, it’s not the fuse.
Looking on the heater coil directly:
The fuse is on the exhaust/air path, not bolted directly to the heating element coil frame on many GE models.
Skipping the model tag:
Not checking the exact model means you may follow the wrong diagram.
Forcing panels:
Bending the rear or front panel because a hidden screw or clip wasn’t released.
Not unplugging first:
Working “live” to save time is a big safety risk and can damage sensitive components.
If you follow the airflow path (drum → blower → exhaust duct → vent), you’ll find the GE dryer thermal fuse quickly and without breaking anything.
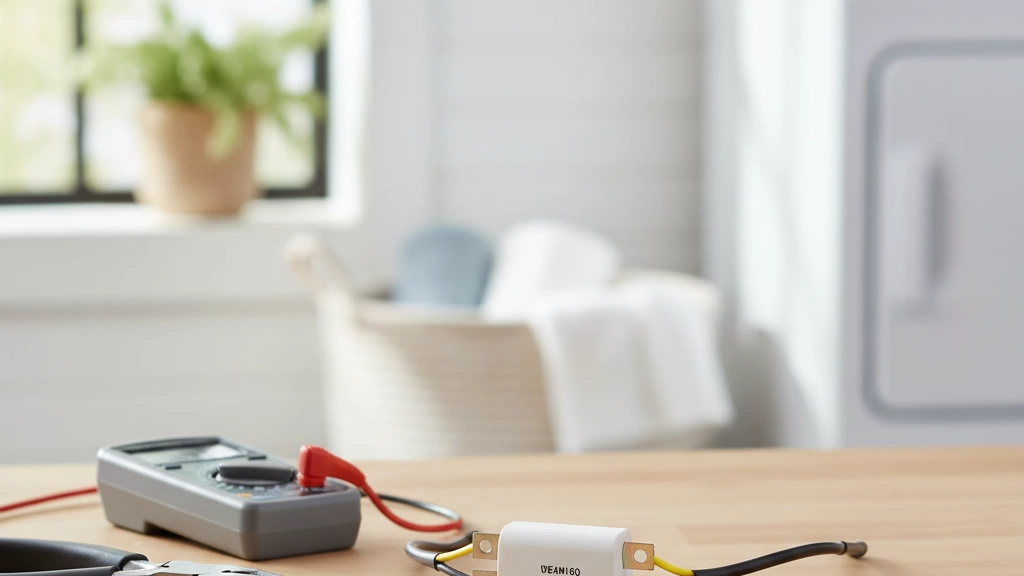
Tools You Need to Test and Replace a GE Dryer Thermal Fuse
You don’t need a full workshop to handle a GE dryer thermal fuse replacement. With a few basic tools and a cheap multimeter, most people can do this safely at home.
Basic hand tools for GE dryer thermal fuse repair
Have these ready before you start:
Phillips screwdriver – to remove back or front access panels
Flathead screwdriver – for gently prying clips or panels
Nut driver set (1/4″, 5/16″) – most GE dryer screws use these sizes
Needle-nose pliers – to pull off and reattach fuse wiring terminals
Small container or magnetic tray – to keep screws from getting lost
Best budget multimeter settings for continuity testing
You don’t need an expensive meter. A $10–$20 digital multimeter is enough to test a GE dryer thermal fuse:
Set the dial to continuity (sound/wave symbol) or lowest ohms (Ω) range
Touch the two probes together – you should hear a beep or see 0–1 Ω
When testing the fuse:
Good fuse: beep or very low resistance (near zero)
Blown fuse: no beep, screen shows OL / open / infinity
If your meter doesn’t have continuity mode, use the 200 Ω range and watch for a near-zero reading.
Optional tools that make the job easier
Not required, but very helpful:
Shop vac – to vacuum lint around the fuse, heater, and vent
Bright flashlight or headlamp – GE dryer fuse locations can be dark and tight
Magnetic parts tray – keeps tiny screws and clips from disappearing
Short extension bit or flexible driver – useful on newer compact models where screws are at awkward angles
Safety gear you should use on a GE dryer
Treat your dryer like any other high‑power appliance. At minimum:
Safety glasses – protect against flying lint, dust, and metal shavings
Cut‑resistant or work gloves – sharp sheet metal edges inside the cabinet
Dust mask (optional) – handy if the dryer and vent are packed with lint
Always unplug the dryer (or turn off the breaker for a hard‑wired unit) before you go anywhere near the GE dryer safety thermostat or thermal fuse.
Where to buy tools locally or online for under $25
You can easily keep this repair budget-friendly:
Local options
Big-box stores (Home Depot, Lowe’s, Walmart): basic screwdriver sets, nut drivers, and multimeters often $10–$25
Auto parts stores: cheap digital multimeters and magnetic trays
Local hardware stores: individual nut drivers, pliers, and safety gear
Online options
Amazon, eBay, and major retailers:
Basic digital multimeter: $10–$20
Screwdriver/nut driver combo sets: $10–$20
Safety glasses + gloves bundle: usually under $15
If you’re starting from zero, you can usually get everything you need to test and replace a GE dryer thermal fuse for under $25–$35, and you’ll still have tools ready for your next home repair.
How to Test a GE Dryer Thermal Fuse Step by Step
Safety first – unplug and prep the dryer
Before you touch anything on a GE dryer that’s not heating or won’t start:
Unplug the dryer from the wall outlet.
If it’s hard‑wired, switch off the correct breaker at the panel.
Pull the dryer out gently so you can get behind it without crushing the vent hose.
If it’s a stacked unit, make sure it’s stable and not rocking while you work.
Never test a thermal fuse with power connected. A few minutes of prep here keeps you safe.
How to access the thermal fuse on your GE dryer
The exact thermal fuse location depends on your GE model, but most electric GE dryers follow one of these patterns:
Rear‑panel access:
Look for a large metal panel on the back.
Remove the screws around the edges.
The thermal fuse is usually a small, flat, white or metal part with two wires, mounted on or near the blower housing or exhaust duct.
Front‑access (some GFD/GTD and newer models):
Remove the top: take out screws at the back edge of the top panel, slide back and lift.
Remove the front panel or lower access panel.
The fuse will be near the blower housing or vent outlet at the front bottom area.
As you remove panels:
Take photos of wire positions with your phone.
Put screws in a small container or magnet tray so you don’t lose them.
Any basic multimeter works for a GE dryer thermal fuse test:
Turn the dial to:
“Continuity” (looks like a sound wave or diode symbol), or
Lowest ohms range (200 Ω or similar) if you don’t have continuity mode.
Touch the two meter probes together:
You should hear a beep (continuity mode) or see 0–0.5 ohms (Ω).
This confirms your meter is working.
Now you’re ready to test the fuse.
Testing the GE dryer thermal fuse with a multimeter
Disconnect the wires:
Slide the two wires off the thermal fuse terminals.
Grab the metal terminal, not the wire insulation, so you don’t pull the wire out.
Place the probes:
Put one meter probe on each terminal of the fuse.
It doesn’t matter which probe goes where.
Read the result:
Continuity mode:
Beep or solid reading = fuse is good.
No beep / no change = fuse is blown.
Ohms mode:
0–1 ohms = fuse is good.
“OL,” “OPEN,” or a very high number (infinity) = fuse is blown.
If the fuse shows OL or no continuity, it’s failed and must be replaced. Do not bypass it as a permanent fix; it’s a safety part.
How to test GE dryer high‑limit and cycling thermostats
While you’re inside the dryer, it’s smart to test the high‑limit thermostat and cycling thermostat too, because a bad thermostat can cause overheating and blow your new fuse again:
Find the thermostats:
High‑limit thermostat: usually on the heater housing or near the thermal fuse.
Cycling thermostat: typically on the blower housing or exhaust duct.
Test method (at room temperature):
Disconnect the wires from the thermostat.
Put one probe on each terminal.
Most should show continuity at room temp (near 0 ohms).
If you get OL / open at room temp on a thermostat that should be closed, that thermostat is bad.
Some multi‑terminal thermostats will have more than two contacts; test in pairs using the same continuity method. If readings don’t match your expectations, it’s safer to replace the thermostat along with the fuse.
How to tell if the fuse is blown without a multimeter (less accurate)
You can get a rough idea even if you don’t own a meter, but this is less safe and not as reliable:
Visual check:
Remove the fuse and inspect it.
Some fuses show burn marks, cracks, or a melted look.
If you clearly see damage, it’s almost certainly blown.
If it looks fine, it still might be bad; looks are not enough.
Temporary bypass test (for a few seconds only):
WARNING: This is risky and only for quick diagnosis.
With power unplugged, connect the two wires that normally go to the fuse together using an insulated jumper wire or alligator clips.
Make sure the bare metal is not touching the dryer’s metal body.
Plug the dryer back in and quickly test:
If the dryer now runs and heats, the fuse was almost certainly the issue.
Unplug the dryer immediately and remove the jumper.
Replace the fuse with the correct part before using the dryer normally.
Never leave the thermal fuse bypassed for real use. It removes a critical safety layer against fire and overheating. If you’re not comfortable doing even basic tests, it’s worth calling a pro rather than guessing.
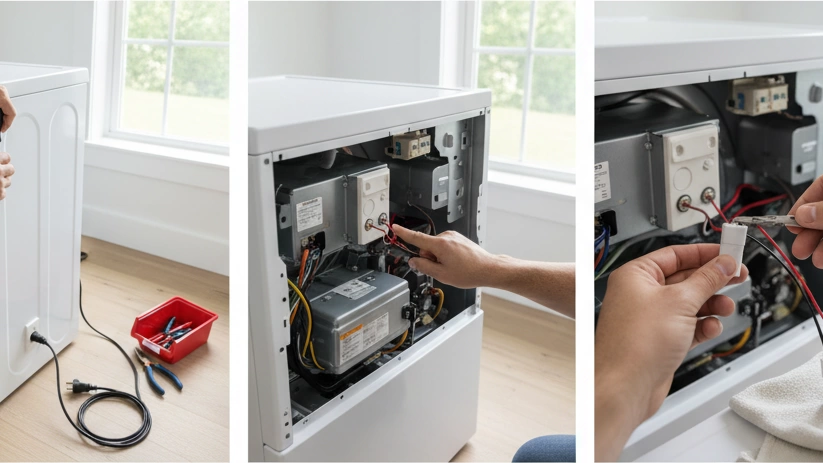
How to Replace a GE Dryer Thermal Fuse
Replacing a GE dryer thermal fuse is a straightforward DIY job if you stay safe and follow each step carefully. Here’s the clean, no-nonsense way to do it.
1. Preparing the dryer and work area
Get the dryer and workspace ready before you touch anything.
Unplug the dryer from the wall outlet. For 240V electric dryers, this is non‑negotiable.
If it’s a hard‑wired dryer, switch off the correct breaker and verify the power is off.
Pull the dryer out a bit so you can reach the back and the vent hose.
Disconnect the vent hose so you don’t damage it while moving the dryer.
Lay down a towel or cardboard behind/next to the dryer to protect your floor and give you a place to set screws.
Keep a small container or magnetic tray for screws so nothing gets lost.
2. Removing the access panel on GE dryer styles
The thermal fuse is usually behind a rear panel or front lower panel, depending on your GE model.
Rear‑panel access (common on many GE/Hotpoint models):
Remove all perimeter screws on the back panel.
Support the panel with one hand as you take out the last screws so it doesn’t bend.
Lift the panel away and set it aside carefully.
Front lower access panel (some GE front‑load styles):
Look for screws along the bottom edge or just inside the door opening.
Remove the screws, then pull the panel out from the bottom and lift it off the clips.
Be gentle – don’t pry with too much force or you’ll crack the panel.
Top access (fewer models):
Remove the screws at the back corners of the top panel.
Slide the top panel back a bit and lift it off.
If a panel feels stuck, stop and recheck for hidden screws instead of forcing it.
3. Disconnecting wires and removing the old thermal fuse
Once you’ve found the GE dryer thermal fuse (a small, usually white or metal oval/rectangle mounted on the blower housing or exhaust duct):
Take a quick photo of the wiring so you know exactly where each wire goes.
Carefully pull off the wire connectors from the fuse terminals. If they’re tight, use needle‑nose pliers and pull on the connector, not the wire.
Remove the mounting screws holding the thermal fuse to the metal housing.
Lift the old fuse out and set it aside. Do not reuse it once it has been blown.
4. Installing the new GE dryer thermal fuse correctly
Installing the new fuse is simple, but orientation and wire placement matter.
Match the new fuse to the old one by:
Shape and mounting hole position
Connector style
Position the new GE dryer thermal fuse in the same orientation as the old one.
Reinstall the mounting screws snugly but don’t overtighten and strip the metal.
Push the wire connectors onto the fuse terminals until fully seated.
Make sure:
No wires are loose or half‑connected
No bare wire is exposed
Wires are routed away from sharp edges or moving parts
5. Reassembling the dryer and double‑checking connections
Before you close everything up, do a quick visual safety check.
Confirm:
All screws are back in the thermal fuse
All wiring around the heater, high‑limit thermostat, and cycling thermostat is tight
Reinstall the access panel:
Line it up correctly before inserting screws
Tighten screws evenly so the panel doesn’t rattle
Reconnect the vent hose, making sure it’s not kinked or crushed.
Slide the dryer back into position with some space behind it for airflow.
6. Testing the dryer after fuse replacement
Now you confirm the fix and watch for any overheating issues.
Plug the dryer back in or turn the breaker back on.
Run the dryer on a timed heat cycle (medium or high heat) with:
A small load of damp towels, or
No load for a quick initial test
Check:
Drum tumbles normally
Heater kicks on within the first couple of minutes (you’ll feel the door area or exhaust warm up)
No burning smell or unusual noise
After 5–10 minutes, step outside and make sure the outside vent hood flap is opening and you feel strong airflow.
If the dryer runs and heats normally, the GE dryer thermal fuse replacement was successful.
7. Common installation mistakes that cause new fuses to blow
If you don’t fix the root cause, a brand‑new GE dryer thermal fuse can blow again fast. Avoid these mistakes:
Not cleaning a clogged dryer vent before running the dryer again
Pushing the dryer back so far that the vent hose is crushed or kinked
Reconnecting the fuse wires loosely, causing arcing or intermittent contact
Mixing up wires between the thermal fuse, high‑limit thermostat, and cycling thermostat
Installing an incorrect fuse (wrong temperature rating or non‑compatible generic part)
Running the dryer with extreme overloads that block airflow inside the drum
Do the fuse, wiring, and vent correctly once, and you’ll usually be good for years instead of weeks.
Why GE Dryer Thermal Fuses Keep Blowing
If your General Electric dryer thermal fuse keeps blowing, something upstream is wrong. The fuse is a safety device – it’s not supposed to be a “regular wear” part. Here’s what usually kills it and how to stop the cycle.
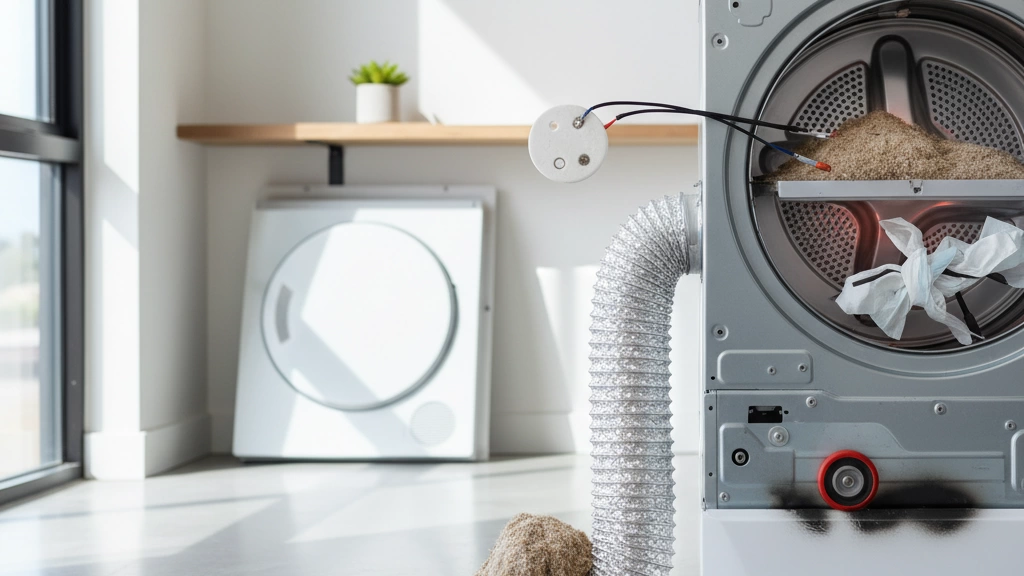
Clogged dryer vents = overheated thermal fuse
Most repeat failures come from a restricted dryer vent. When hot air can’t get out, heat builds up around the heater housing and the GE dryer thermal fuse trips to prevent a fire.
Common vent-clog symptoms:
Dryer runs but no heat after a few minutes
Outside vent flap barely opens or stays shut
Dryer and laundry room feel hotter than normal
Burning or “hot dust” smell during a cycle
Fix:
Clean the lint filter every load
Detach the vent hose and clear lint from the hose and wall duct
Make sure the outside vent hood is fully opening and not packed with lint or bird nests
Restricted airflow behind or under the dryer
Even if the vent is clean, airflow can still be choked off right behind the machine.
Watch for:
Dryer pushed tight against the wall, crushing the vent hose
Long, sagging vent hose runs that collect lint in low spots
Kinked flexible foil vent instead of a rigid or semi-rigid metal duct
Dust bunnies and lint piles under and behind the dryer
To prevent overheating:
Pull the dryer forward so the hose isn’t pinched
Use short, straight vent runs with smooth metal duct
Your GE dryer cycling thermostat controls how hot the drum gets. If it sticks closed or reads temperature wrong, the heater may stay on too long and cook the thermal fuse.
Signs your thermostat may be the real problem:
Clothes come out very hot or slightly scorched
Dryer cuts out mid-cycle and won’t heat again until the fuse is replaced
New fuse blows again within a cycle or two, even with a clean vent
In many cases, it’s smart to replace the high-limit thermostat and thermal fuse together, especially on older machines.
Overloading the dryer and blocking airflow
Stuffing the drum full kills airflow inside the dryer, even if the vent is perfect. Hot air can’t circulate through the load, so heat concentrates around the heater and safety devices.
Avoid:
Filling the drum more than about 3/4 full
Washing heavy items (comforters, blankets, towels) in one overloaded batch
Letting items sit bunched up – dryer needs space for air to move through the clothes
If your GE dryer not drying well and you keep overloading, you’re pushing the fuse to its limit every time.
Cheap or badly installed aftermarket fuses
Not all fuses are equal. A low‑quality aftermarket thermal fuse might:
Have the wrong temperature rating
Use thin, inconsistent internal material
Be crimped or mounted poorly, making it heat up faster than it should
Installation mistakes that make good fuses fail early:
Loose wire connections that arc or heat up
Mounting the fuse in the wrong location or at a weird angle
Reusing burnt or damaged terminals
If you go aftermarket instead of OEM, stick to brands with clear specs and stable quality, like we expect from proper low-voltage switchgear components.
How long a GE dryer thermal fuse should last
Under normal use, with:
Clean, short vent
Good airflow around and under the dryer
Correct load sizes
Healthy thermostats
…a GE dryer thermal fuse should last many years and often the entire life of the dryer. You should not be changing it every few months.
If you’ve blown:
1 fuse – likely a one-time blockage or long-term lint buildup
2 fuses – you probably still have a vent or thermostat issue
3 or more – stop replacing and start diagnosing; something is clearly overheating the system
Bottom line: a blown GE dryer thermal fuse is a symptom, not the root problem. Fix airflow and temperature control first, and you won’t be chasing fuses over and over.
Dryer Vent Cleaning to Protect the Thermal Fuse
If your GE dryer thermal fuse keeps blowing, the first thing I’d look at is the vent. A clogged vent overheats the dryer, kills fuses, and is a real fire risk. Keeping that vent clean protects the fuse, the heater, and your home.
Signs Your GE Dryer Vent Is Clogged or Restricted
Watch for these common GE dryer vent clogged symptoms:
Dryer takes too long to dry – 2+ cycles needed for one load.
Outside vent hood barely opens or flap doesn’t move when the dryer runs.
Top or back of the dryer feels very hot to the touch.
Laundry room feels humid or warmer than usual when drying.
Burning, musty, or “hot dust” smell from the dryer or vent area.
Lint buildup around the door seal or on the floor behind the dryer.
GE dryer thermal fuse keeps blowing or the dryer overheats and shuts down.
If you see two or more of these, assume airflow is restricted and take action.
Quick DIY Airflow Test at the Outside Vent Hood
Here’s a fast check you can do in under 2 minutes:
Start the dryer on a heated cycle with some damp towels.
Go outside to the dryer vent hood.
Make sure the flap is opening fully.
Place your hand a few inches away from the vent:
Strong, steady airflow = vent is likely okay.
Weak airflow, puffing, or no flap movement = vent is restricted.
If you see lint stuck on the screen or around the flap, that’s a clear warning sign.
If airflow is weak, don’t keep running the dryer. That’s how thermal fuses and heating elements burn out.
Step-by-Step: How to Clean a Dryer Vent Line Yourself
You don’t need to be a pro to do a basic dryer vent cleaning. Here’s the simple version:
Unplug the dryer (and shut off the gas if you have a gas dryer, even though we’re focused on electric models).
Pull the dryer out carefully to access the vent hose.
Disconnect the vent hose from the back of the dryer and from the wall.
Vacuum the lint:
Inside the hose
Inside the vent opening on the wall
Around the dryer’s exhaust outlet
Use a dryer vent cleaning brush or drill-powered kit to push through the vent line from indoors toward the outside:
Feed the brush in and rotate it
Work in sections, pulling lint out as you go
Go outside and clear lint from the vent hood and surrounding area.
Reconnect the vent hose:
Keep it as short and straight as possible
Avoid crushed or sharply bent flex hose
Push the dryer back, making sure you don’t pinch the hose.
Run the dryer again and re-test airflow at the outside vent.
Recommended Dryer Vent Cleaning Tools and Kits
Budget-friendly tools that make the job easier:
Dryer vent brush kit (drill-attach or manual, 3–8 meters).
Shop vacuum with hose attachment for lint removal.
Flashlight to see inside the vent line and behind the dryer.
Screwdriver / nut driver to loosen vent clamps.
If you’re already using safety or electrical components (like a switch-disconnector or similar protection devices in your laundry circuit), make sure everything is properly rated and installed. If you ever need specialized switching hardware, we support that line of gear directly through our industrial switch-disconnector solutions.
You can find most of these tools locally at hardware stores or online for under $25.
How Often Should You Clean the Dryer Vent?
For most homes, a simple schedule works:
Standard household (1–4 people): Every 12 months
Large families / daily laundry: Every 6 months
Long vent runs, lots of bends, or venting through a roof: Every 6 months
If a thermal fuse or high-limit thermostat has blown: Clean the vent before installing new parts
If you dry a lot of heavy items (towels, bedding, pet blankets), clean more often. It’s cheaper than replacing fuses and thermostats over and over.
When to Hire a Professional Dryer Vent Cleaning Service
DIY works for straight, short vent runs. Call a pro if:
The vent run is long, goes through a ceiling, attic, or multiple bends.
You can’t reach both ends of the vent safely.
You notice burning smells, discoloration, or very high heat around the vent.
A new GE dryer thermal fuse blows again quickly even after cleaning.
Your home is in a multi-unit building with shared venting.
If you’re unsure whether the problem is just the vent or something electrical, reach out and describe your setup clearly to a local appliance or electrical specialist. When you contact a professional, be ready with your dryer model, vent length, and symptoms—that helps them quote fairly and avoid unnecessary upsells. If you need to get in touch with us directly about electrical safety or related components, you can use our contact page and we’ll point you in the right direction.
Best Replacement Thermal Fuses for GE Dryers in 2025
When a General Electric dryer thermal fuse blows, the replacement you choose matters a lot more than most people think. The right fuse keeps the dryer safe, stops repeat failures, and protects the heating element and control board.
OEM vs aftermarket GE dryer thermal fuses – pros and cons
Here’s the simple breakdown:
OEM (original GE parts)
Pros:
Exact fit and correct temperature rating
More consistent quality and safer in the long run
Less risk of weird problems (won’t start, keeps blowing, overheating)
Cons:
Usually more expensive
Sometimes backordered or limited in certain countries
Aftermarket (compatible / generic)
Pros:
Cheaper, easier to find online globally
Many reputable brands are perfectly reliable if you match specs
Cons:
A lot of very low‑quality fuses out there
Wrong temp rating = nuisance trips or no protection at all
Thin terminals that overheat or loosen over time
My rule:
If the dryer is newer, under warranty, or high-end (GE Profile, GE Adora, GFD), I go OEM.
For older GTD/Hotpoint models, a proven aftermarket kit with the right specs is fine.
WE4M137 vs WE04X26139 vs WE49X28295 – what’s the difference?
These are the three part numbers you see most when searching “GE dryer thermal fuse replacement”:
WE4M137 thermal fuse:
One of the most common GE dryer safety thermostats
Used on many older and mid-range GE and Hotpoint electric dryers
Typically mounts on or near the heater housing
Often sold alone or bundled with a cycling thermostat
WE04X26139 thermal fuse:
Newer style fuse / high‑limit for recent GE models (including many GTD and GFD series)
Updated design and bracket pattern; not a direct swap for WE4M137
Common in 2020+ GE dryer lineups
WE49X28295 thermal fuse kit:
OEM GE kit that usually includes:
Thermal fuse / high‑limit thermostat
Matching cycling thermostat
Sometimes extra hardware
Good option when the dryer has been overheating or blowing fuses repeatedly
Designed as a matched set so temps and cycling are correct
Short version:
If your model calls out WE4M137 — use that or an exact-spec replacement.
If the tech sheet or parts list shows WE04X26139 — do not substitute; use the correct part.
If your dryer has a history of overheating — a kit like WE49X28295 is safer than swapping the fuse alone.
Always confirm with your exact model number before buying.
How to spot cheap, unreliable thermal fuses online
There’s a lot of junk on marketplaces. I avoid parts that show these red flags:
No brand name or “unbranded” product page
No actual temperature rating shown on the listing or fuse body
Super thin or dull-colored terminals (poor metal quality)
Bad reviews mentioning:
“Blew again in a week”
“Didn’t fix the no-heat problem”
“Melted terminal / burning smell”
Listings that say “universal dryer fuse fit all brands” with no model list
Price that’s way too low (e.g., 10 fuses for the price of one normal OEM fuse)
If you can’t see clear photos of the markings and rating on the fuse, I skip it.
What to look for in a quality GE-compatible thermal fuse kit
Good GE dryer thermal fuse kits have a few things in common:
Clear specs:
Temperature rating printed on the body (°C/°F)
Amperage and voltage rating (e.g., 250V, 10A or similar)
Model compatibility:
Explicit list of GE model numbers or at least clear part cross-reference (WE4M137, WE04X26139, WE49X28295, etc.)
Solid build:
Clean, tight terminals that match the original
Mounting holes line up with OEM brackets
Included parts:
Fuse plus high‑limit thermostat and sometimes cycling thermostat
New screws or spade connectors in better kits
Brand + warranty:
Named manufacturer
When to Call a Pro for a GE Dryer Thermal Fuse Problem
If your general electric dryer thermal fuse keeps blowing or the dryer still won’t work after you replace it, that’s usually the point where I stop DIY and call a tech. A bad fuse is often a symptom, not the whole problem.
Warning signs it’s more than just a blown fuse
If you see any of this, don’t keep guessing:
Burnt smell, scorch marks, or melted plastic inside the dryer or at the cord
Dryer trips the breaker as soon as it starts or when the heater kicks on
Sparks, buzzing, or humming from the control panel, motor area, or terminal block
Drum doesn’t turn, but you hear the motor humming or straining
Control panel dead or glitchy even after you replace the thermal fuse
Visible burnt connectors or wiring near the heater, thermostat, or fuse
These are bigger issues than a simple GE dryer thermal fuse replacement.
What it means when a new fuse blows fast
If a fresh GE dryer thermal fuse blows again in:
One cycle → assume a serious overheating or electrical issue
A few days → airflow restriction or bad thermostat is still there
Randomly → could be a failing heater, loose connection, or control problem
Common hidden causes:
Clogged vent or crushed hose behind the dryer
Bad cycling thermostat or high‑limit thermostat letting temps run too high
Failing heating element touching the drum or housing and shorting out
Aftermarket fuse with wrong temperature rating that blows too early
If you’ve already cleaned the vent, checked airflow, and used the correct GE-compatible thermal fuse (WE4M137, WE04X26139, WE49X28295, etc.), and it still pops, it’s time for a pro.
Electrical and wiring issues you should not DIY
There’s a hard line where I don’t recommend home repair:
Burned terminal block where the power cord connects
Melted, brittle, or blackened wires anywhere in the dryer
Heater short to ground (heating element touching the metal housing)
Control board scorch marks, blown components, or exposed traces
Breaker keeps tripping even with an empty dryer and new fuse
These are high‑voltage issues. A wrong move here can shock you or start a fire. Let a licensed tech with the right meters and parts handle these.
Problems often mistaken for a bad thermal fuse
A GE dryer not heating or GE dryer won’t start doesn’t always mean the thermal fuse is bad. It might be:
Drum or motor issues
Drum turns hard by hand, squeals, or stops mid‑cycle
Motor hums but won’t spin → bad motor or seized drum, not just the fuse
Control board or timer problems
Timer advances, but no heat and the fuse tests good
Random start/stop, dead display, or only some cycles heat
Door switch or belt switch faults
Dryer won’t start at all, but the fuse and power check out
If the GE dryer thermal fuse continuity test is good and you still have “no heat” or “won’t start,” that’s a sign to bring in a professional.
How to talk to an appliance tech so you don’t overpay
Go into the call with clear info. That keeps the visit short and the bill fair.
Before you call, have:
Brand + full model number (from the door frame or rear panel)
What it’s doing: “Drum runs but no heat,” or “Dead, no lights, no sound,” etc.
What you’ve already done:
Cleaned the vent / checked outside flap
Replaced the GE dryer thermal fuse (give the part number if you have it)
Any error codes or odd noises
When they arrive, ask directly:
“Can you show me exactly what failed?” (fuse, heater, thermostat, board)
“Is this a common failure on this GE model?”
“What’s the price for the part and the labor separately?”
“Is there anything else you recommend to prevent this again?”
“Is this repair worth it for the age of the dryer?”
Stay away from vague approvals like “Do whatever it needs.” Be specific and approve each repair line so you’re not surprised at checkout.
Bottom line: If the general electric dryer thermal fuse keeps blowing, you see any signs of burnt wiring, or the dryer still has no heat after a correct fuse and vent cleaning, stop replacing parts blindly. At that point, a pro is cheaper than guessing and safer than pushing your luck with 240V.
GE Dryer Thermal Fuse FAQ
Can I bypass the GE dryer thermal fuse for testing only?
Short answer: I don’t recommend it.
Technically, you can jump the two wires together briefly to see if the dryer runs/heats.
But a bypassed thermal fuse = no safety protection. If there’s an overheating issue, you’re risking a fire.
If you do it anyway:
Only for seconds, with the dryer watched the whole time
Unplug it immediately after the test
My advice: just buy a cheap multimeter and test the fuse properly. It’s safer and still costs less than a service call.
Will a generic thermal fuse from Amazon work in my GE dryer?
Sometimes yes, sometimes no.
What matters:
Same temperature rating (°C or °F)
Same style and size (mounting holes, terminals)
Rated for 240V and proper amperage
From a seller that actually lists specs, not just “fits GE”
If you’re in the US, UK, or EU, I lean toward:
OEM GE fuses when possible
Or brand-name aftermarket (ERP, Supplying Demand, etc.)
Cheap generic kits with no specs are the ones that fail early or blow for no reason.
Difference between a GE dryer thermal fuse and a thermostat
Part
What it does
Resettable?
When it trips
Thermal fuse
One-time safety cutoff for overheating
No (one-time)
Extreme overheat / vent or airflow problem
Cycling thermostat
Controls normal drum temperature while drying
Yes
Opens/closes repeatedly as it heats/cools
High-limit thermostat
Backup over-temp control before fuse blows
Yes (usually)
When temp climbs too high repeatedly
So:
Thermal fuse = safety device, blows once, must be replaced
Thermostat = temperature manager, usually reusable unless it fails
How often should a GE dryer thermal fuse blow under normal use?
Under normal use: almost never.
Many dryers run 10+ years on the original fuse.
If your thermal fuse has blown:
Treat it as a symptom, not “just a bad part.”
You likely have clogged vents, poor airflow, or bad thermostats.
If a fuse blows more than once every few years, something else is wrong.
Where to find the GE dryer model and serial number tag
You’ll need this to order the correct GE dryer thermal fuse.
Typical locations:
Front-load GE / GFD series
Open the door → tag on the door frame (around the opening)
Top-load / GTD / older GE & Hotpoint
Open door → tag on the door frame or inside the door opening
Sometimes behind the lint filter door area
Stacked or compact units
Inside the door opening or on the side panel behind the door
Look for a sticker with something like “MODEL: GTD42E…” and “SERIAL: …”.
Is it safe to keep using the dryer if the fuse keeps blowing?
No, that’s a red flag.
If the GE dryer thermal fuse keeps blowing, it usually means:
Vent is clogged or crushed
Dryer is overheating from poor airflow
Cycling or high-limit thermostat is failing
Cheap fuse is out of spec
Continuing to use it:
Risks fire or major damage
Will just keep eating fuses and money
At that point, I’d:
Clean the entire vent run
Check thermostats and heating element
If still blowing, call a pro. It’s not worth guessing.
How long does it take to replace a GE dryer thermal fuse for a beginner?
If you’re handy at all, it’s manageable.
Rough timing:
Skill level
Time estimate (first try)
Total beginner
45–90 minutes
Comfortable with tools
30–45 minutes
Experienced DIYer
20–30 minutes
That includes:
Unplugging and sliding the dryer out
Removing the back or front panel (model dependent)
Swapping the GE dryer thermal fuse
Reassembling and test running
If you have the right fuse, a basic screwdriver, and a multimeter, it’s a solid DIY job for most people.
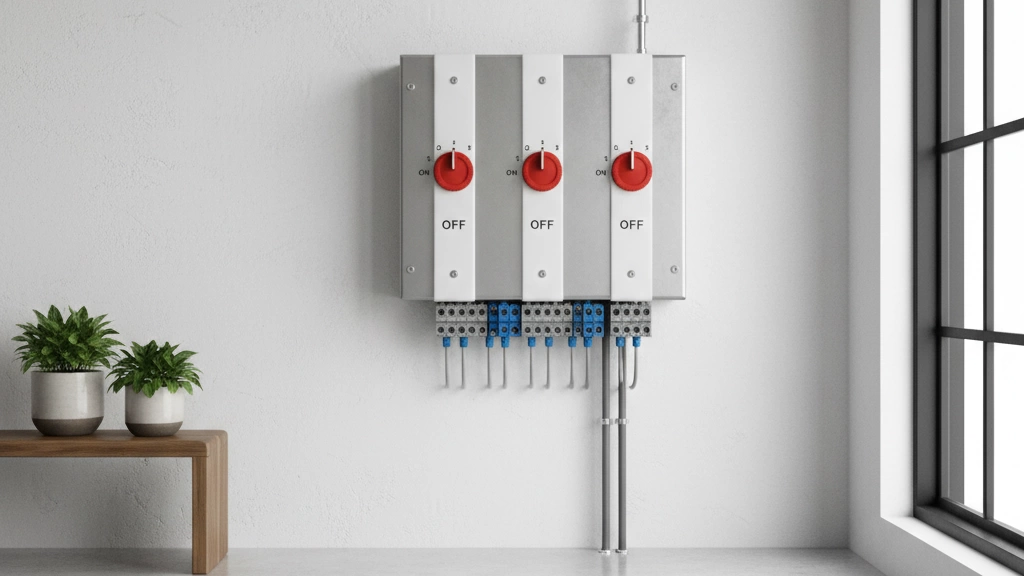
Core Functions & Standards of Switch Isolators Switch isolators serve a critical role in electrical safety by providing positive isolation—a reliable and visible means to disconnect power for maintenance or emergency shutdown. This isolation is achieved through either an air gap or contact separation, ensuring no electrical continuity when switched off. The air gap typically offers a clear physical […]
If your car suddenly loses power to the radio, windows, headlights, or even refuses to start, there’s a good chance the problem starts at one place: the auto electrical fuse box. Most drivers know it exists… but not what it does, where it is, or how to fix it when something goes wrong. In this guide, you’ll quickly learn: We’ll walk you through diagnosing, testing, […]
We use cookies to enhance your browsing experience, serve personalised ads or content, and analyse our traffic. By clicking "Accept All", you consent to our use of cookies.