Recloser vs Circuit Breaker vs Sectionalizer
The functional differences between a recloser, a circuit breaker and a sectionalizer, how the three coordinate to isolate a faulted section, and which arrangement suits each network.
Read More
A vacuum circuit breaker rarely fails without warning. It fails because a check that should have been done was skipped. This vacuum circuit breaker maintenance checklist sets out the inspections, electrical tests, and fault-finding steps that keep a medium-voltage VCB reliable, together with the failure modes that cause most unplanned outages. The same logic applies whether you operate an indoor metal-clad panel or a pole-mounted vacuum circuit breaker on an overhead feeder: verify the vacuum, verify the mechanism, verify the insulation, and verify the control circuit.
A vacuum circuit breaker is not one device but four subsystems that age differently. Treating them as a single item is the most common reason maintenance programs miss real problems.
If you are new to the device itself, the primer on the medium voltage circuit breaker explains how the interrupter, mechanism, and control circuit fit together before you plan any test schedule.
Intervals are starting points, not fixed rules. Adjust them by duty cycle, environment, and the manufacturer’s manual — a breaker switching capacitor banks ten times a day is not the same asset as one switched twice a year.
| Task | Typical interval | What you are looking for |
|---|---|---|
| Visual inspection of breaker and cubicle | 6–12 months | Dust, corrosion, cracked bushings, moisture, damaged paint, blocked ventilation |
| Cleaning of insulating surfaces | 12 months, or per pollution level | Conductive pollution film on bushings and supports |
| Mechanism lubrication | 3–5 years or per operation count | Dry or hardened grease, sluggish travel, worn linkages |
| Infrared thermography under load | 12 months | Hot terminals and joints caused by loose connections |
| Vacuum integrity (withstand) test | 3–5 years, and after heavy fault interruptions | Loss of vacuum in the interrupter |
| Contact resistance measurement | 3–5 years | Contact erosion, misalignment, poor terminal contact |
| Insulation resistance test | 3–5 years | Moisture or contamination across the insulation |
| Open and close timing test | 3–5 years | Slow operation, pole discrepancy, weak springs |
| Trip and close coil checks, auxiliary contacts | 12 months | Open coils, dirty contacts, loose wiring |
| Protection relay verification | 2–4 years | Drifted settings, failed trip output, stale firmware logic |
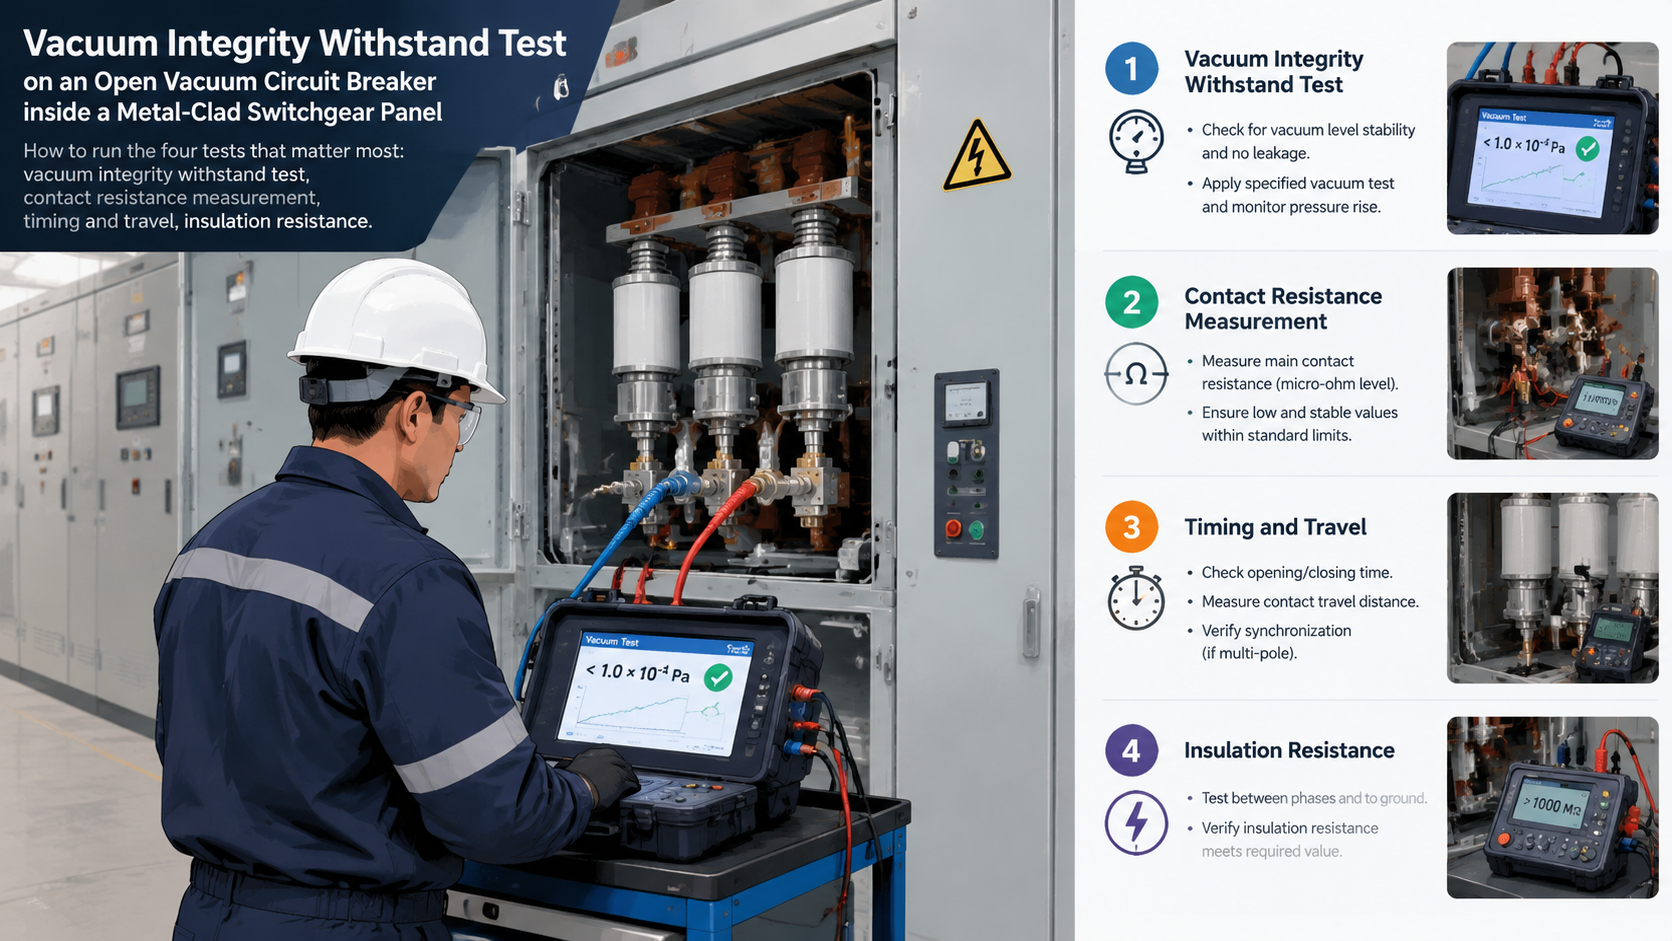
The interrupter is sealed and opaque, so the vacuum level cannot be inspected visually. With the breaker open and isolated, apply power-frequency test voltage across the open contact gap and hold it for the specified duration. A sound bottle withstands the voltage with negligible leakage. A bottle that has lost vacuum breaks down, and there is no field repair — the interrupter must be replaced as a unit. The physics behind the test, and why the gap recovers its dielectric strength so quickly, is covered in the guide to the vacuum circuit breaker working principle.
Use a micro-ohmmeter across each pole in the closed position and compare the reading with the manufacturer’s value and with the other poles. Rising resistance points to contact erosion, oxide build-up, or a poorly tightened terminal. A large imbalance between poles is a stronger warning sign than a single slightly high value.
Record opening time, closing time, and pole discrepancy. The values confirm that the mechanism still delivers enough energy for fast interruption and that the three poles operate together. Timing drift usually shows up before a mechanical failure does, which is what makes it worth trending.
Measure phase-to-earth and phase-to-phase insulation resistance with the breaker open and closed. Falling values across successive tests, rather than a single low reading, are the useful signal — they indicate moisture ingress or pollution build-up that cleaning and cubicle heating can usually correct.
| Symptom | Likely cause | First action |
|---|---|---|
| Breaker will not close | Closing spring not charged, latch not released, interlock engaged, low control voltage | Check control supply, spring charge status, and interlock logic before touching the mechanism |
| Breaker will not trip | Open trip coil, broken wiring, stuck auxiliary switch, relay output failure | Test coil continuity and the trip circuit from the relay through to the coil |
| Slow or heavy operation | Dry or hardened lubrication, weakened spring, misaligned linkage | Clean and re-lubricate per the manual, then re-run the timing test |
| Overheating at terminals | Loose bolted joints, high contact resistance, unbalanced loading | Confirm with thermography, then torque to specification and re-measure resistance |
| Frequent nuisance tripping | Relay settings, CT wiring errors, harmonic content, genuine faults | Verify protection coordination and CT circuits before changing settings |
| Loss of vacuum | Manufacturing defect or long-term stress on the envelope | Confirm by withstand test; plan interrupter or breaker replacement |
| Excessive contact wear | High fault-interruption duty rather than normal switching | Compare the operation counter against the electrical endurance rating |
Vacuum interrupters are sold as maintenance-free primary contacts, and for normal load switching that claim holds up. The wear is concentrated elsewhere. Every operation stretches and releases springs, works latches against stops, and moves linkage pins through a fraction of a millimetre. Over tens of thousands of operations, lubrication dries out, tolerances open up, and timing drifts. That is why the schedule above weights mechanical and control checks more heavily than interrupter work.
Outdoor pole-mounted units deserve particular attention because they combine the mechanism with weather. A modern design such as the ZW32-12G-T630-20 outdoor vacuum circuit breaker uses a sealed enclosure and a spring or permanent-magnet actuator, which reduces the maintenance burden, but it still needs enclosure sealing, bushing cleanliness, and secondary wiring checks. Where a boundary or tie position uses a dedicated outdoor breaker such as the ZW32-12F outdoor vacuum boundary circuit breaker, add an inspection of the pole-mounting hardware and the control cable entry to the routine.
Repair is the right answer while spares are available and test results are stable; where the tests point the other way, apply the criteria in our guide to how to choose a vacuum circuit breaker. Consider retrofit when the interrupter and mechanism are sound but the protection, control, or monitoring layer is obsolete — modern relays and condition sensors often cost less than a full replacement. Replacement becomes the rational choice when the interrupter has lost vacuum, when fault levels now exceed the original short-circuit rating, when insulation shows generalised deterioration, or when the operation counter has passed the electrical endurance rating and spare parts are no longer supplied.
A workable VCB maintenance program rests on four habits: inspect often enough to catch contamination and loose joints, test the vacuum and the contacts on a fixed interval, trend timing and resistance results instead of judging single readings, and treat the operating mechanism as the wear item it is. Breakers that are checked this way stay in service for decades and rarely fail without a warning a trained eye could have seen.
If you are specifying replacement breakers or need a maintenance and spare-parts plan for a mixed fleet, review our comparison of the VCB and RMU switchgear or contact the factory with your voltage class, fault level, and operation counts for a recommended interval schedule.
Most sites use a 6–12 month visual and infrared inspection, lubrication every 3–5 years or after a set number of operations, and electrical tests including a vacuum withstand test every 3–5 years. Frequent-switching duty and polluted or coastal sites need shorter intervals.
The vacuum level cannot be measured from outside, so the standard method is a power-frequency withstand test across the open contacts. If the gap breaks down, the interrupter has lost vacuum and must be replaced as a sealed unit.
Mechanism-related problems dominate: failure to close because the closing spring is not charged, failure to trip because of a trip coil or auxiliary switch fault, and slow operation caused by dried lubrication or a weakened spring. Loss of vacuum and contact wear are less frequent but more serious.
No. The vacuum interrupter itself needs no routine service during its life, but the operating mechanism, control circuit, terminal connections, and insulation all require inspection. Treating the whole breaker as maintenance-free is the main cause of avoidable failures.
Contact resistance, insulation resistance, opening and closing times, pole discrepancy, and the operation counter. Trending these values over years reveals deterioration that a single pass or fail test will miss.